Configure Asset Optimization
To install and configure the SysTrack Asset Optimization plugin for ServiceNow, complete the steps in the following sections. These steps apply to both SysTrack Cloud and SysTrack On-Premises (except where noted).
Get the Plugin
Follow these steps to get and install the Asset Optimization plugin:
-
Log in to the ServiceNow Store with a HI permission account and download the Asset Optimization SysTrack plugin.

-
Install the Asset Optimization plugin on the Plugins page in ServiceNow.
Configure SysTrack and the Plugin
Follow these steps to configure SysTrack and the Asset Optimization plugin:
-
Establish a MID server on a system connected to the SysTrack network. See the ServiceNow wiki for more on installing MID servers.
NOTE: A MID server is required only for SysTrack On-Premises.
-
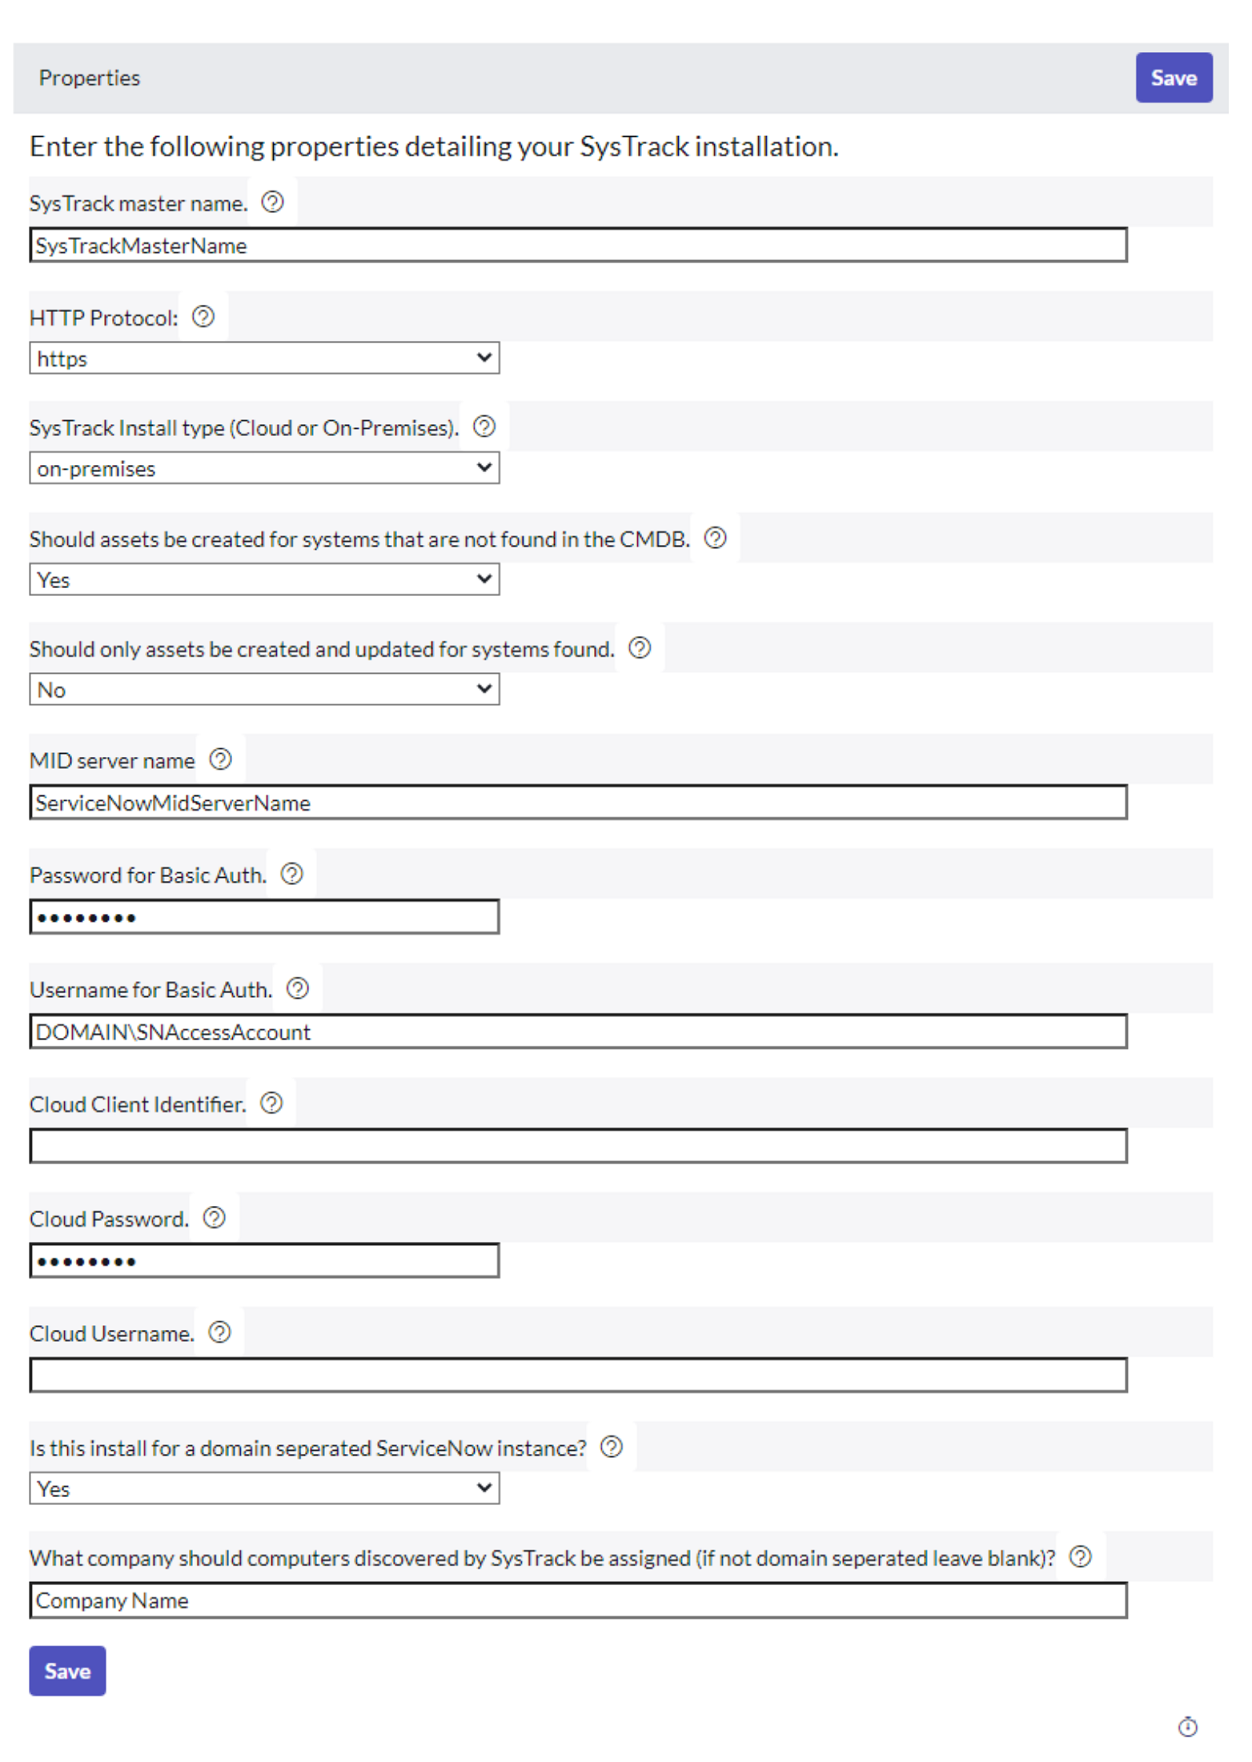
Open the Properties for SysTrack Asset Optimization.
-
Edit the Properties fields as follows:
-
SysTrack master name is the FQDN or IP of the SysTrack Master for the integration.
-
HTTP Protocol is a toggle for whether or not the SysTrack Master uses HTTPS.
-
The next toggle is to decide whether to create asset records in ServiceNow only for systems found by SysTrack.
-
The next toggle controls whether both asset and computer records should be created if a system is found by SysTrack and has no record in ServiceNow.
-
SysTrack install type defines whether the integration targets a SysTrack On-Premises master or a SysTrack Cloud instance.
-
Password for Basic Auth and Username for Basic Auth are the credentials for an account that has access to the SysTrack API for the master. These are needed only for SysTrack On-Premises.
-
Cloud Username, Cloud Client Identifier, and Cloud Password are the login details for the SysTrack Cloud instance for the integration. These are needed only for SysTrack Cloud.
-
Is this install for a domain separated ServiceNow instance controls whether you are installing the Asset Optimization plugin in a Domain Separated ServiceNow instance.
-
The What company should computers discovered by SysTrack... field defines the domain to which the computers discovered by SysTrack are assigned.
-
IMPORTANT: Do you already have data in ServiceNow for systems that are tracked by SysTrack (before you begin using Asset Optimization)? If so, the data in your ServiceNow cmdb_ci_computer table must include FQDNs for the systems. This is required because Asset Optimization uses the FQDN to match systems that it imports from SysTrack to existing systems in ServiceNow. If the existing data does not include FQDNs, you will get duplicate data for those systems as you begin to use Asset Optimization.
Set Up Basic Authentication for SysTrack API
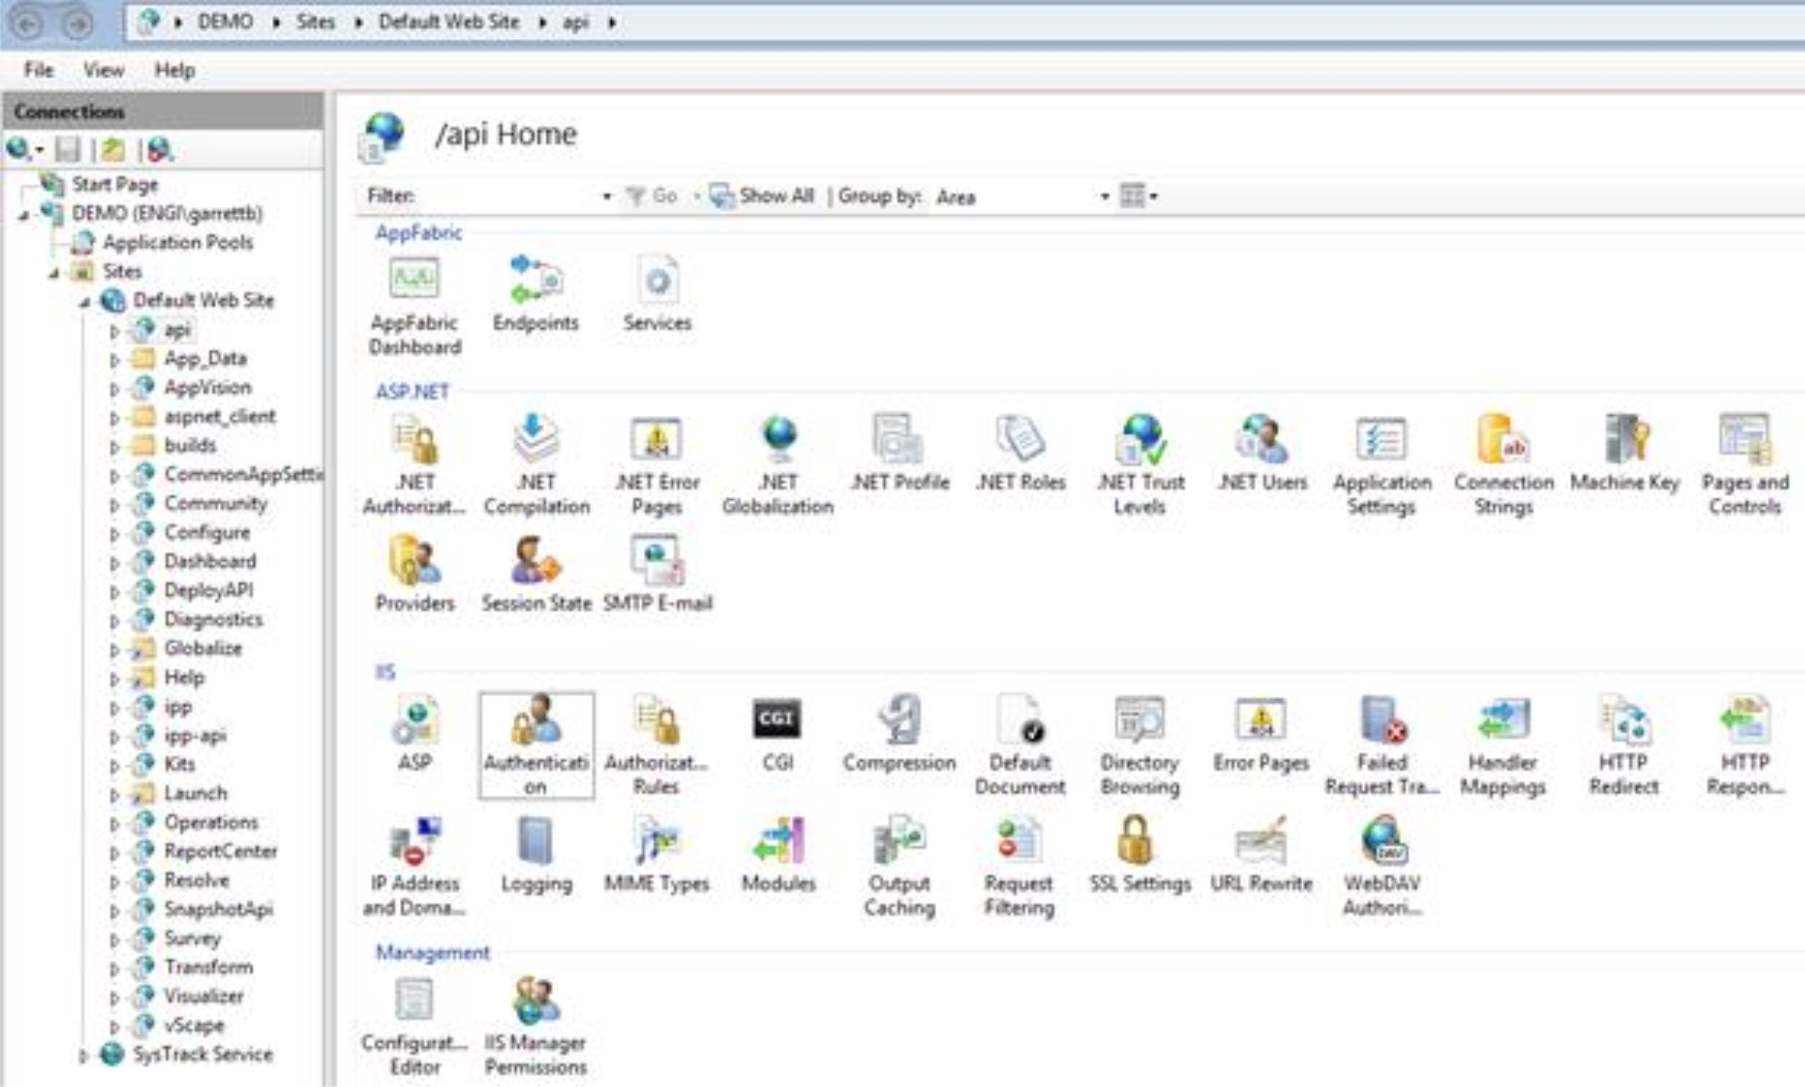
The following steps show how to set up Basic Authentication for the SysTrack API on the SysTrack Master server.
NOTE: These Basic Authentication steps are required only for SysTrack On-Premises.
-
On the SysTrack master system, navigate to the IIS Manager.
-
Go to Sites > Default Web Site > api.
-
Select Authentication.
-
In the Authentication menu, enable Basic Authentication.
TIP: If Basic Authentication isn't visible as an option, you can enable it in Windows feature settings.
Test the Configuration
The following steps show how to test your Asset Optimization configuration.
NOTE: These testing steps are required only for SysTrack On-Premises.
-
Check the ServiceNow instance's connection to the MID server. Use the Servers menu under the MID Servers heading on the Instance page.
-
Check the MID server's connection to the SysTrack host machine by checking the Services menu. A MID Server service should appear in the list.
Configure a Schedule for Asset Optimization
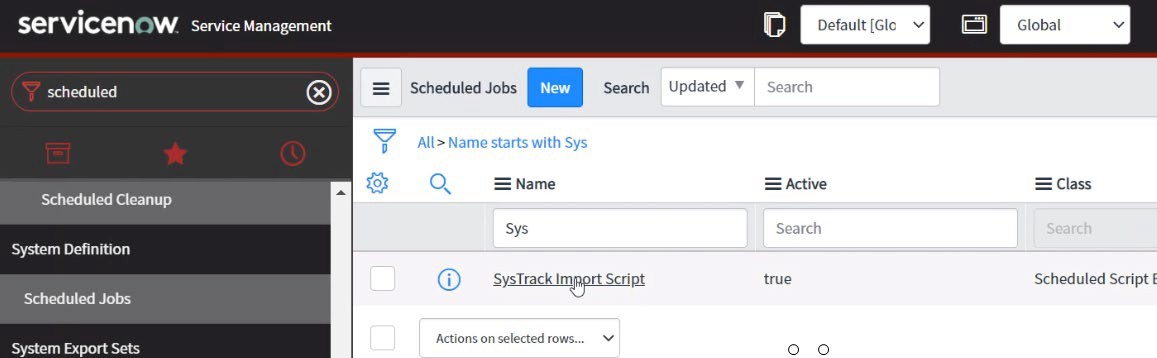
After you have installed and configured the Asset Optimization plugin, you can configure the schedule for how often (and at what time) your ServiceNow CMDB will be updated with fresh data from SysTrack.
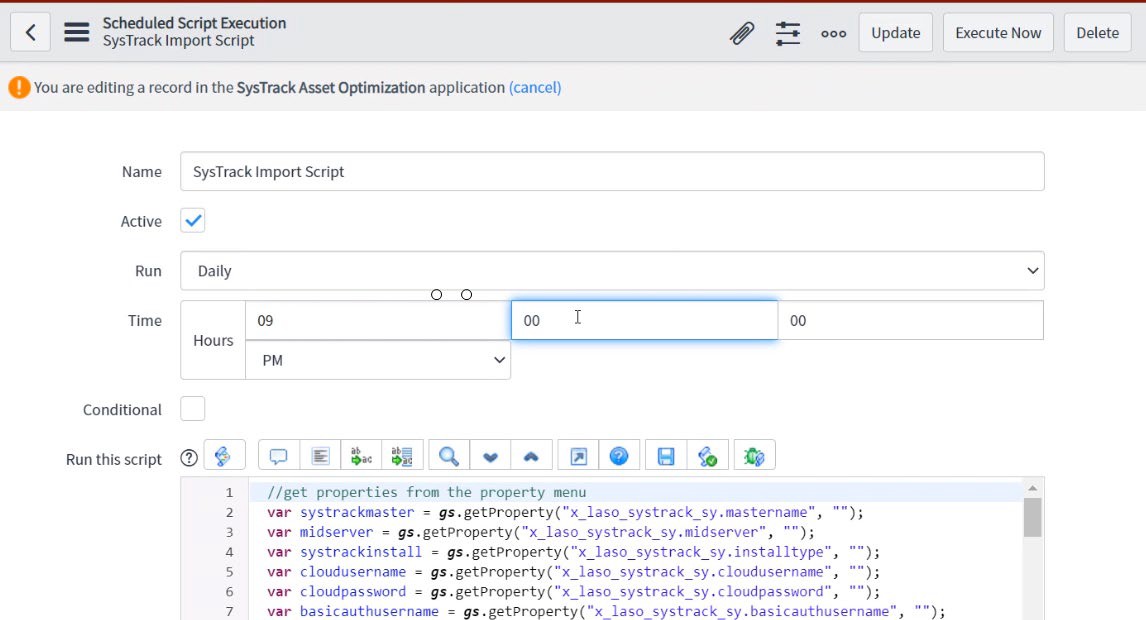
In ServiceNow, search for Scheduled Jobs and locate the SysTrack Import Script.
Set the schedule to suit your business hours (for example, late evening).
TIP: The Run this script field includes the preconfigured import script. To use the integration, you do not need to edit this script.
On This Page