Use Customized Attributes in Assist for ITSM
If you customize your ServiceNow Incidents or Computers, Assist for ITSM gives you the option to customize five attributes to work with your ServiceNow customizations.
Assist for ITSM allows you to customize three attributes in ServiceNow Incident forms:
-
Configuration Item (CI)
-
FQDN
-
CI tables
It also allows you to customize two attributes in ServiceNow Computer forms:
-
FQDN
-
Domain (location of a system)
To enable these customizations, you need to make some changes to your ServiceNow forms and to your Assist for ITSM Properties, as explained in the following sections.
IMPORTANT: If you leave your ServiceNow forms at their defaults, you do not have to perform any of these steps. The Assist for ITSM application is designed to work with the ServiceNow form defaults.
Edit Your ServiceNow Forms
If you want to customize your ServiceNow forms, see the ServiceNow documentation for instructions. ServiceNow's Field Properties box includes the Name field. You will use values from the Name field as you proceed with the rest of the sections on this page to make your customizations work with Assist for ITSM.
Edit Your Assist for ITSM Properties
For any of the changes you made to your Incidents or Computers, you need to update the Assist for ITSM application properties to work with those changes. The following sections explain how to update these properties.
Access Assist for ITSM Properties
First you need to navigate to the Properties page. To access it, you must have Administrator permissions.
Follow these steps:
-
Go to the ServiceNow Home page.
-
Use the All menu to find and select Assist for ITSM - Properties.
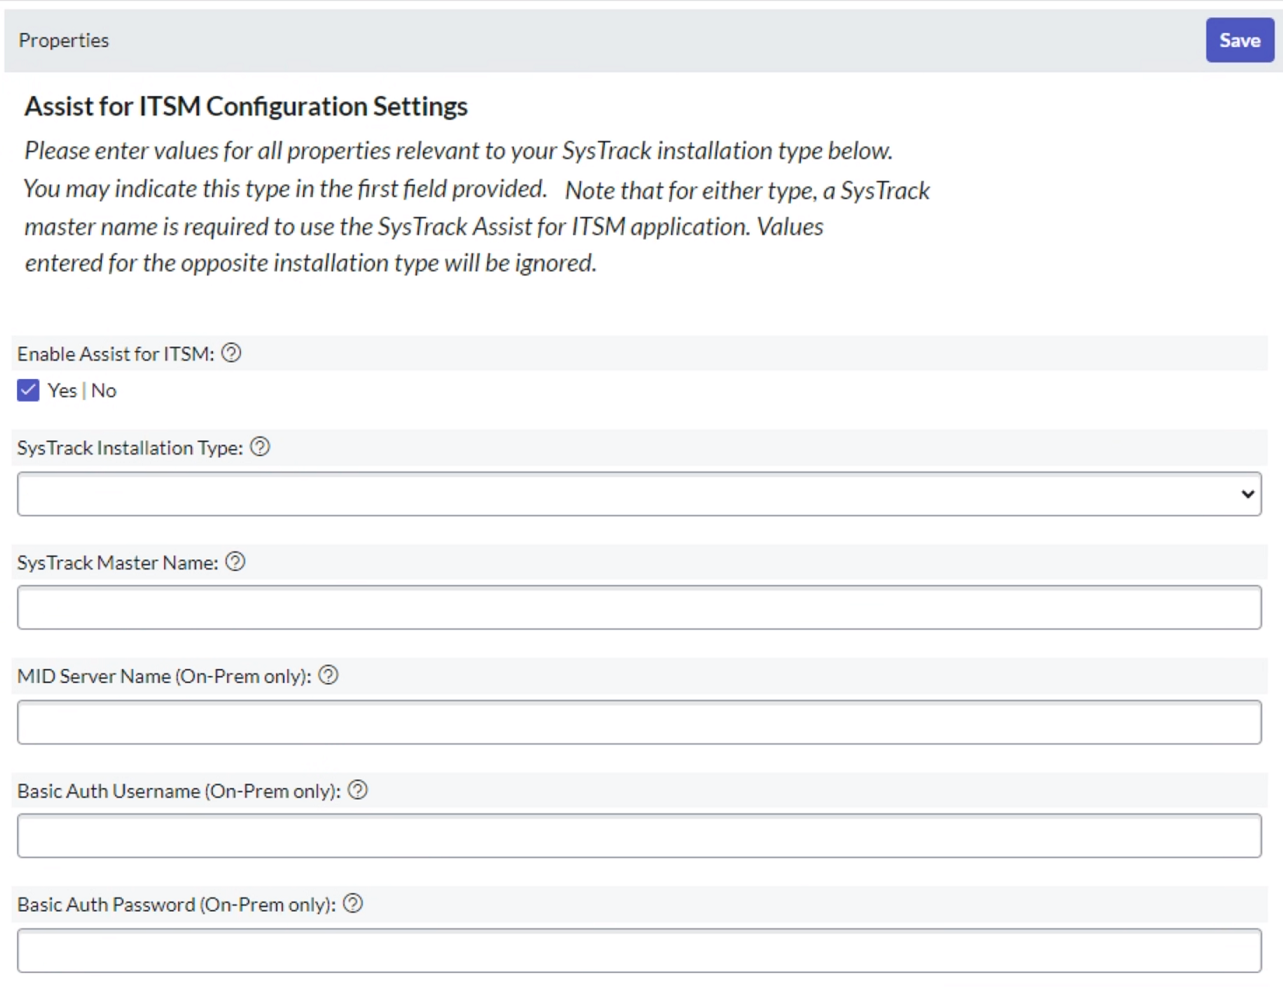
The Properties page includes the title Assist for ITSM Configuration Settings and enables you to edit many settings.
NOTE: When you enable the new form fields in the following sections, the system automatically disables the default versions of those fields. Any Incident or Computer forms that still use those default fields will have an error in those fields.
The fields you need to edit are at the bottom of the Properties page.
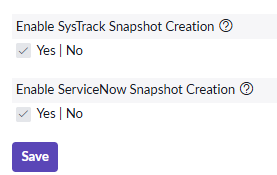
Configure Snapshot Creation for New Incidents
NOTE: The Configure Snapshot Creation for New Incidents settings are available in Assist for ITSM version 4.2 and later.
On the Assist for ITSM Properties page, you can control two independent snapshot options for newly created ServiceNow Incidents:
-
Enable ServiceNow Snapshot Creation – controls whether a snapshot is created and stored in ServiceNow and shown in Assist for ITSM as the ServiceNow Snapshot view.
-
Enable SysTrack Snapshot Creation – controls whether a snapshot is created and stored in SysTrack (SysTrack database) and used when viewing a cached/historical system state in Resolve.
To update snapshot creation settings:
-
Go to Assist for ITSM – Properties in the ServiceNow menu.
-
On the Assist for ITSM Configuration Settings page, locate the Enable ServiceNow Snapshot Creation and Enable SysTrack Snapshot Creation options.
-
Set the options according to your requirements:
-
Both enabled (default behavior)
-
A ServiceNow snapshot is created and can be selected in Assist for ITSM (for example, ServiceNow Snapshot or Snapshot {MM:DD:YYYY} in the Detected Issues / Diagnostics / Checklist tabs).
-
A SysTrack snapshot is created and stored in the SysTrack database.
-
Users may see “Preparing snapshot” while the SysTrack snapshot is being created, and a Resolve Snapshot link when it is available.
-
-
Disable only ServiceNow snapshot creation (ServiceNow option OFF, SysTrack option ON)
-
No ServiceNow snapshot is created for new incidents, so users only have the Live view in Assist for ITSM (the “ServiceNow Snapshot” / “Snapshot {MM:DD:YYYY}” option does not appear).
-
A SysTrack snapshot is still created and stored in the SysTrack database.
-
The “Preparing snapshot” text and Resolve Snapshot link continue to appear as the SysTrack snapshot is created and becomes available.
-
-
Disable only SysTrack snapshot creation (ServiceNow option ON, SysTrack option OFF)
-
A ServiceNow snapshot is created and can be selected in Assist for ITSM as usual.
-
No SysTrack snapshot is created or stored in the SysTrack database.
-
The “Preparing snapshot” text and Resolve Snapshot link do not appear, because there is no SysTrack snapshot to view in Resolve.
-
-
Both disabled (ServiceNow and SysTrack snapshot creation OFF)
-
No snapshots are created for new incidents.
-
Assist for ITSM only shows the Live view, and there is no cached/historical state available in Resolve.
-
-
-
Select Save.
NOTE: When you change either snapshot setting (in ServiceNow or SysTrack), the change only affects Incidents created after you update the setting. Existing incidents and any snapshots that were already created are not changed. SysTrack snapshots that are created when Enable SysTrack Snapshot Creation is enabled are automatically deleted 30 days after the associated Incident is closed or cancelled, to reduce database storage.
Configure Snapshot Settings for Domain Split Environments
If you are using the Assist for ITSM Domain Info table for a multi‑domain ServiceNow instance, snapshot behavior is controlled per domain in the Domain Info records. The options in each Domain Info record mirror the global properties:
-
Enable ServiceNow Snapshot Creation
-
Enable SysTrack Snapshot Creation
To update snapshot behavior for domain split environments:
-
In ServiceNow, navigate to Assist for ITSM Domain Infos.
-
Open the Domain Info record for the domain you want to update.
-
Locate the Enable ServiceNow Snapshot Creation and Enable SysTrack Snapshot Creation options.

-
Set the options for that domain:
-
Enable or disable ServiceNow snapshot creation to control whether a ServiceNow snapshot is created and available in Assist for ITSM for incidents in that domain.
-
Enable or disable SysTrack snapshot creation to control whether a SysTrack snapshot is created and stored in the SysTrack database for incidents in that domain.
-
The effect of each combination (both enabled, only ServiceNow enabled, only SysTrack enabled, both disabled) is the same as described in the previous section, but limited to incidents in this specific domain.
-
-
Select Save.
NOTE: As with the global properties, changes you make in Domain Info records only affect new incidents created after you update the settings for that domain. Existing incidents and any snapshots already created are not changed.
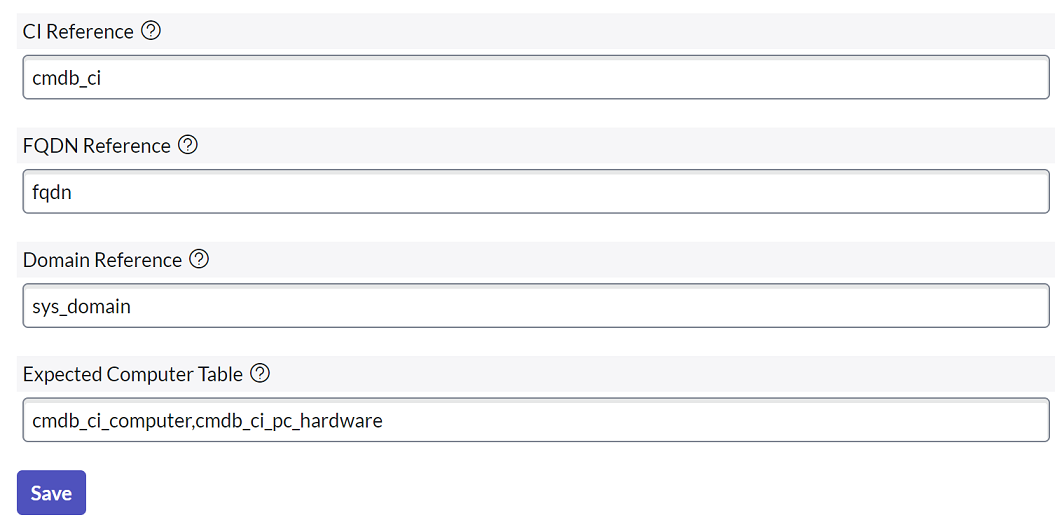
Customize the Configuration Item, Computer FQDN, or Domain Reference
On the Assist for ITSM Properties page, follow these steps for each customization you made:
-
If you customized the Configuration Item, go to the CI Reference field and change the default cmdb_ci to the value you entered in the Name field of the ServiceNow Field Properties.
-
If you customized the FQDN, go to the FQDN Reference field and change the default fqdn to the value you entered in the Name field of the ServiceNow Field Properties.
-
If you customized the Domain, go to the Domain Reference field and change the default sys_domain to the value you entered in the Name field of the ServiceNow Field Properties.
-
At the upper right of the page, select Save.
Customize the FQDN Input for an Incident
On the Assist for ITSM Properties page, follow these steps if you need to complete the customization of the FQDN for an Incident:
-
In the CI Reference field, clear anything from the field and leave it empty.
-
Go to the FQDN Reference field and change the default fqdn to the value you entered in the Name field of the ServiceNow Field Properties.
-
At the upper right of the page, select Save.
Customizing the CI Table
On the Assist for ITSM Properties page, follow these steps if you need to complete the customization of the CI Table Reference. You need to do this when you use customized tables or a non-default Computer table in your ServiceNow environment. The following steps change the expected table values for what is a computer, as recognized by Assist for ITSM:
-
In the CI Table Reference field, remove the default value and add the following comma-separated list of four values:
cmdb_ci_computer,cmdb_ci_pc_hardware,cmdb_ci_computer,cmdb_ci_spkg
-
At the upper right of the page, select Save.
On This Page