Configure Assist for ITSM (SysTrack Cloud)
The following sections explain how to configure ServiceNow to integrate with the cloud version of SysTrack.
Cloud SysTrack Integration Prerequisites
To integrate ServiceNow and a cloud version of SysTrack, you need the following items.
|
Item |
Description |
|---|---|
|
ServiceNow HI account access |
Allows the downloading of SysTrack apps |
|
Supported release of ServiceNow |
Required release for SysTrack apps |
|
ServiceNow ITSM module installed |
Required for Assist for ITSM plugin |
|
ServiceNow account with Admin role |
Required to configure the integration |
|
Tenant Admin account |
Required for configuring the service account, password, and IIS configuration |
|
SysTrack Administrator account |
Account with rights to access SysTrack Configure |
|
Azure B2C client identifier |
Call Lakeside Support for this information |
Multi-Domain ServiceNow Instances
If you are in a multi-domain ServiceNow instance, you must add records to the Assist for ITSM Domain Info table in ServiceNow, rather than configure the info in Properties. To access this table, select the Assist for ITSM Domain Infos in the application menu. For each table record, you must include the full domain name and all the information about the SysTrack install for that domain. The value in the Domain Name field is the one used by the application script to match to the Incident domain and retrieve credentials from the relevant record. The Domain field denotes the domain under which the record exists. In most cases, the Domain Name should match the name in the Domain field, but you can configure the record differently if needed.

SysTrack ID User Attribute
The SysTrack ID is a user‑level attribute on the ServiceNow User record. It is used by the SysTrack Detected Issues and SysTrack Tools tabs to determine which user should be targeted when running tools that require a user context. Therefore, you might want to make sure all SysTrack‑associated users have their SysTrack ID set correctly in the ServiceNow instance. This is not required unless you want to run an automation as a specific user on the system. To enable editing, you might have to add the SysTrack ID field to the User form.
Assist for ITSM provides options to find and match users. First, Assist for ITSM tries to match the username. If there is no match, it tries the SysTrack ID. If this option fails, it tries the UPN and email address. These options enable Assist for ITSM to pull as much data as possible into ServiceNow.
The SysTrack ID is a property of the Caller object. If you need the Caller object to be populated, you must do that. SysTrack does not populate the Caller object.
If you leave the SysTrack ID empty, keep in mind that any user-ran Automations in ServiceNow will select a random user context from the available user sessions currently live on the endpoint, and the Automation will run under that user context. This could create unexpected situations for you if you have a user-ran Automation that, for example, deletes content from a specific folder when space is low, because that Automation will run on a random user's system.
If you follow the best practice and put any value in the SysTrack ID property, user-ran Automations will try to match that value with an account that currently has a session on the endpoint, and the Automation will run under the matching user's context. If the Automation does not find an explicit match, it will not run. This eliminates the possibility of unexpected situations like the one described in the preceding paragraph.
Configure ServiceNow for the Integration with SysTrack (Cloud)
Follow these steps to configure your SysTrack Cloud to be ready for integration with ServiceNow:
-
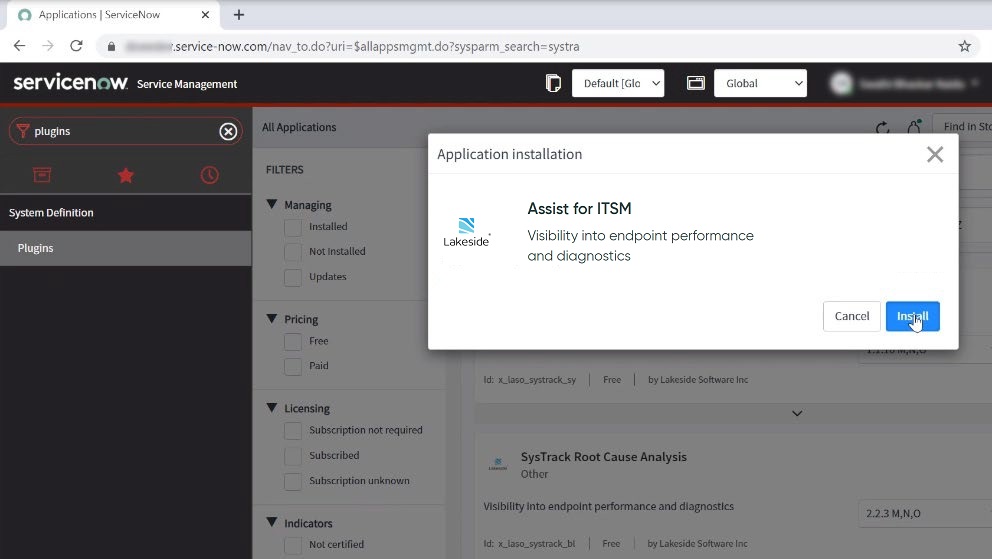
Download the Assist for ITSM plugin
Log in to the ServiceNow Store with an account that has HI permission and download the Assist for ITSM SysTrack plugin.
-
Install the plugin
Install the Assist for ITSM plugin on the Plugins page in ServiceNow.
-
Create ServiceNow groups and assign Assist for ITSM roles
Create the following ServiceNow groups and assign the listed roles to these groups. The roles were created automatically when you installed the SysTrack plugin. The names of the ServiceNow groups can be whatever you want to name them. The names in this example are Administrator and User.
To have Assist for ITSM data and snapshots created automatically when an incident is opened, the user creating the incident must have either the
x_laso_systrack_bl.userrole or the read‑onlyx_laso_systrack_bl.ro_userrole (new in Assist for ITSM 4.2).Group
Roles to assign
Administrator
Assign the following roles. All are optional except the one marked as required:
-
x_laso_systrack_bl.user(required) -
admin
The
x_laso_systrack_bl.userrole is required for downloading and configuring the plugins. Having this Administrator group is not essential, because you can give the roles to the user responsible for configuration.User
Assign the following roles:
-
x_laso_systrack_bl.userorx_laso_systrack_bl.ro_user -
x_laso_systrack_bl.Autofixes -
x_laso_systrack_bl.AutomationHistory -
x_laso_systrack_bl.Compliance -
x_laso_systrack_bl.Tools
The user roles correspond to the Assist for ITSM tabs. For example, if you want the user to see the Automation History tab, the user needs to have the
x_laso_systrack_bl.AutomationHistoryrole.The
x_laso_systrack_bl.ro_userrole is intended for users who can create incidents but should not use the Assist for ITSM application directly.-
Users who have only the
x_laso_systrack_bl.ro_userrole (and notx_laso_systrack_bl.user) cannot open or interact with the Assist for ITSM tabs. -
However, when they create an incident, Assist for ITSM still retrieves SysTrack data and creates the snapshot at incident creation (if snapshot creation is enabled).
-
They cannot manage or edit Assist for ITSM settings or data.
Prior to this role, only users with the
x_laso_systrack_bl.userrole could create the Assist for ITSM snapshot data during incident creation. We recommend addingx_laso_systrack_bl.ro_userto any self‑service or limited‑access roles where users are allowed to create their own incidents but are not responsible for incident or Assist for ITSM management.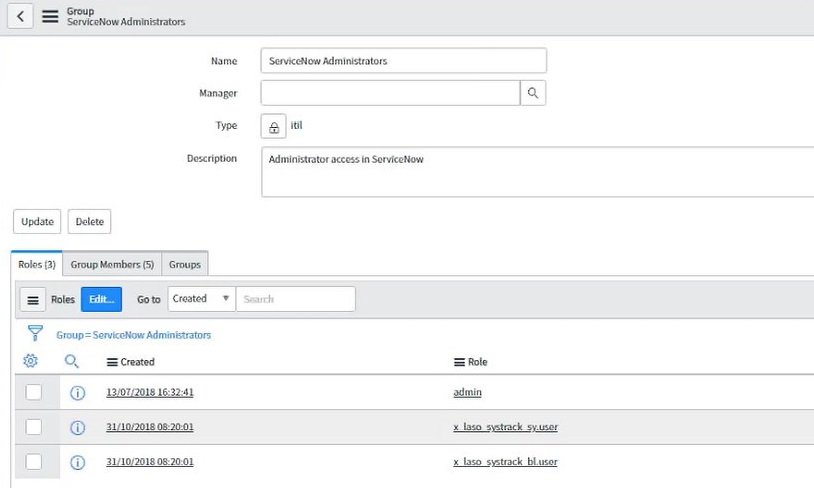
-
-
Add users to the groups
Add the appropriate users to the ServiceNow groups that you created in the previous step. The users will get the assigned roles after you add them to the groups.
-
Open the Assist for ITSM Properties
Log into the ServiceNow instance with a user that has the roles required for configuration. Search for SysTrack. The SysTrack plugins you installed will appear in the list.

-
Configure the Assist for ITSM Properties for SysTrack Cloud
Open the Properties page for the Assist for ITSM plugin. Use the following guidelines to configure the settings:
-
This example describes a cloud setup, so leave the On‑Prem and Basic Auth settings blank.
-
In the SysTrack Installation Type field, enter
cloud. -
In the HTTP Protocol field, select
https. -
In the SysTrack Master Name field, enter the FQDN of the SysTrack Master.
-
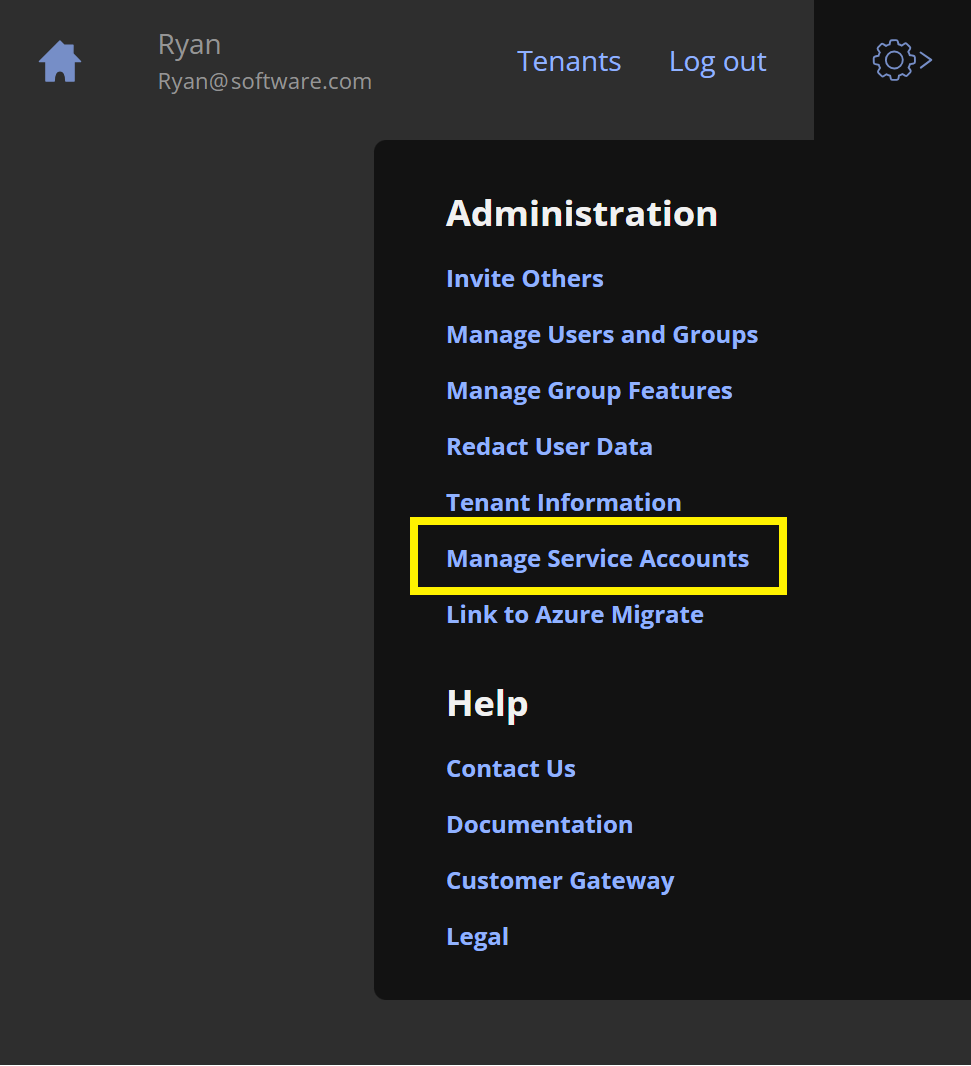
In the Username field, enter the ServiceNow Accounts user.
TIP: To create a ServiceNow Accounts user, go to select Manage Service Accounts in your SysTrack Cloud.
-
In the Password field, enter the password for the ServiceNow Accounts user.
-
In the Client Identifier field, enter the Azure client identifier. Contact Lakeside Support if you need assistance.

-
Select Sensors and Automations for Assist for ITSM
The sensors that you see in Assist for ITSM (on the System Checklist tab) are the same as those you configured for use in Assist in SysTrack.
For Assist in SysTrack the enabled sensors are selected by a SysTrack System Administrator. All available System Checklist sensors are enabled by default, but a SysTrack user with Configure administrator rights (a SysTrack System Administrator) can edit settings and the underlying variables that determine whether the sensor is compliant from Configure. For more information see documentation for System Checklist.
Edit the Assist for ITSM Fields and Tabs
For Service Operations Workspace only (not for Incident Management), you have the option to edit the views that control the SysTrack fields and tabs that appear on your incidents. The fields and tabs are preconfigured to show everything you generally need. However, if you do have a need to change the views, see the steps here.
Snapshot Retention and Snapshot Settings
Assist for ITSM takes a SysTrack snapshot when a ServiceNow Incident is created. Support technicians can toggle between Snapshot Live and the snapshot taken at incident creation in the Assist for ITSM tabs.
For both SysTrack Cloud and SysTrack On‑Premises:
-
The SysTrack snapshot associated with an incident is automatically deleted 30 days after the ServiceNow Incident is closed or cancelled.
-
Administrators can configure Assist for ITSM so that no snapshot is created when new incidents are opened. This setting only affects incidents created after snapshot creation is disabled. Existing incidents and any snapshots that were already created are not changed and continue to follow their configured expiration behavior.
For details about the properties used to control snapshot behavior and how to edit them, see Use Customized Attributes in Assist for ITSM.
On This Page