Operational Pulse Integration with Qualtrics
SysTrack sensors integrate with Qualtrics so that you can use Qualtrics pulse surveys to ask your users about their experience with an acute incident and understand the qualitative impact that the incident had on the users.
During urgent IT issues, your team can leverage SysTrack’s more than 1,300 sensors to help send immediate Qualtrics surveys to affected end users. With the fast feedback from these surveys, your team can troubleshoot issues as they happen and even proactively set up measures to prevent future problems.
This integration uses SysTrack's webhooks. For information about webhooks and other third-party applications, see Webhook Support for Sensor Notifications.
Prerequisites for Configuration
Before you start the configuration procedures in the following sections, complete the following prerequisites:
-
Install the Operational Pulse extension in Qualtrics. See the Qualtrics documentation for information about how install extensions.
-
Create a directory of users in Qualtrics. You will need this directory and its Directory ID as you create a Qualtrics workflow. See the Qualtrics documentation for information about how to create this directory and get the ID.
-
Create Qualtrics mailing lists for any surveys you plan to use, as explained in this Qualtrics documentation.
-
If you have not created an API token in Qualtrics, you need to create one. See the Qualtrics documentation for details on how to create or find your API token.
Configure this Integration
To use this integration, you need to configure items in both SysTrack and Qualtrics. Here are the configuration procedures you need to complete, which are explained in full detail in the following sections:
|
Configuration procedure |
How many do you need? |
|---|---|
|
In Qualtrics, create a workflow for your recipient. |
Create only one. You should have only one recipient (webhook). Therefore, you need to create only one workflow in this procedure. |
|
In SysTrack, configure a recipient. |
Create only one. Because the SysTrack recipient is simply a webhook that allows your data to flow into Qualtrics, the best practice is to create only one recipient for this integration. |
|
In Qualtrics, create surveys. |
Create as many as you want. Make sure to create a SysTrack notification for each survey. |
|
In SysTrack, configure notifications. |
Create one for each Qualtrics survey. For each Qualtrics survey you want to send, you need to configure a corresponding notification in SysTrack. |
|
In Qualtrics, create workflows for surveys. |
Create one of these workflows for each of your surveys. This workflow controls when your survey will be sent. So you need one workflow for each survey. |
Create a Qualtrics Workflow for Your Recipient
In Qualtrics, you need to create a JSON HTTP Request workflow for each recipient that you created in SysTrack.
NOTE: Because the SysTrack recipient is simply a webhook that allows your data to flow into Qualtrics, the best practice is to create only one recipient for this integration. Therefore, you also need only one of these JSON HTTP Request workflows.
Follow these steps to create this workflow:
-
In Qualtrics main menu, select Workflows.
-
Select Create a Workflow, and select Started when an event is received.

-
Enter a name for the workflow, and select a Location. The Location can be Stand-alone workflow or one of your projects.
-
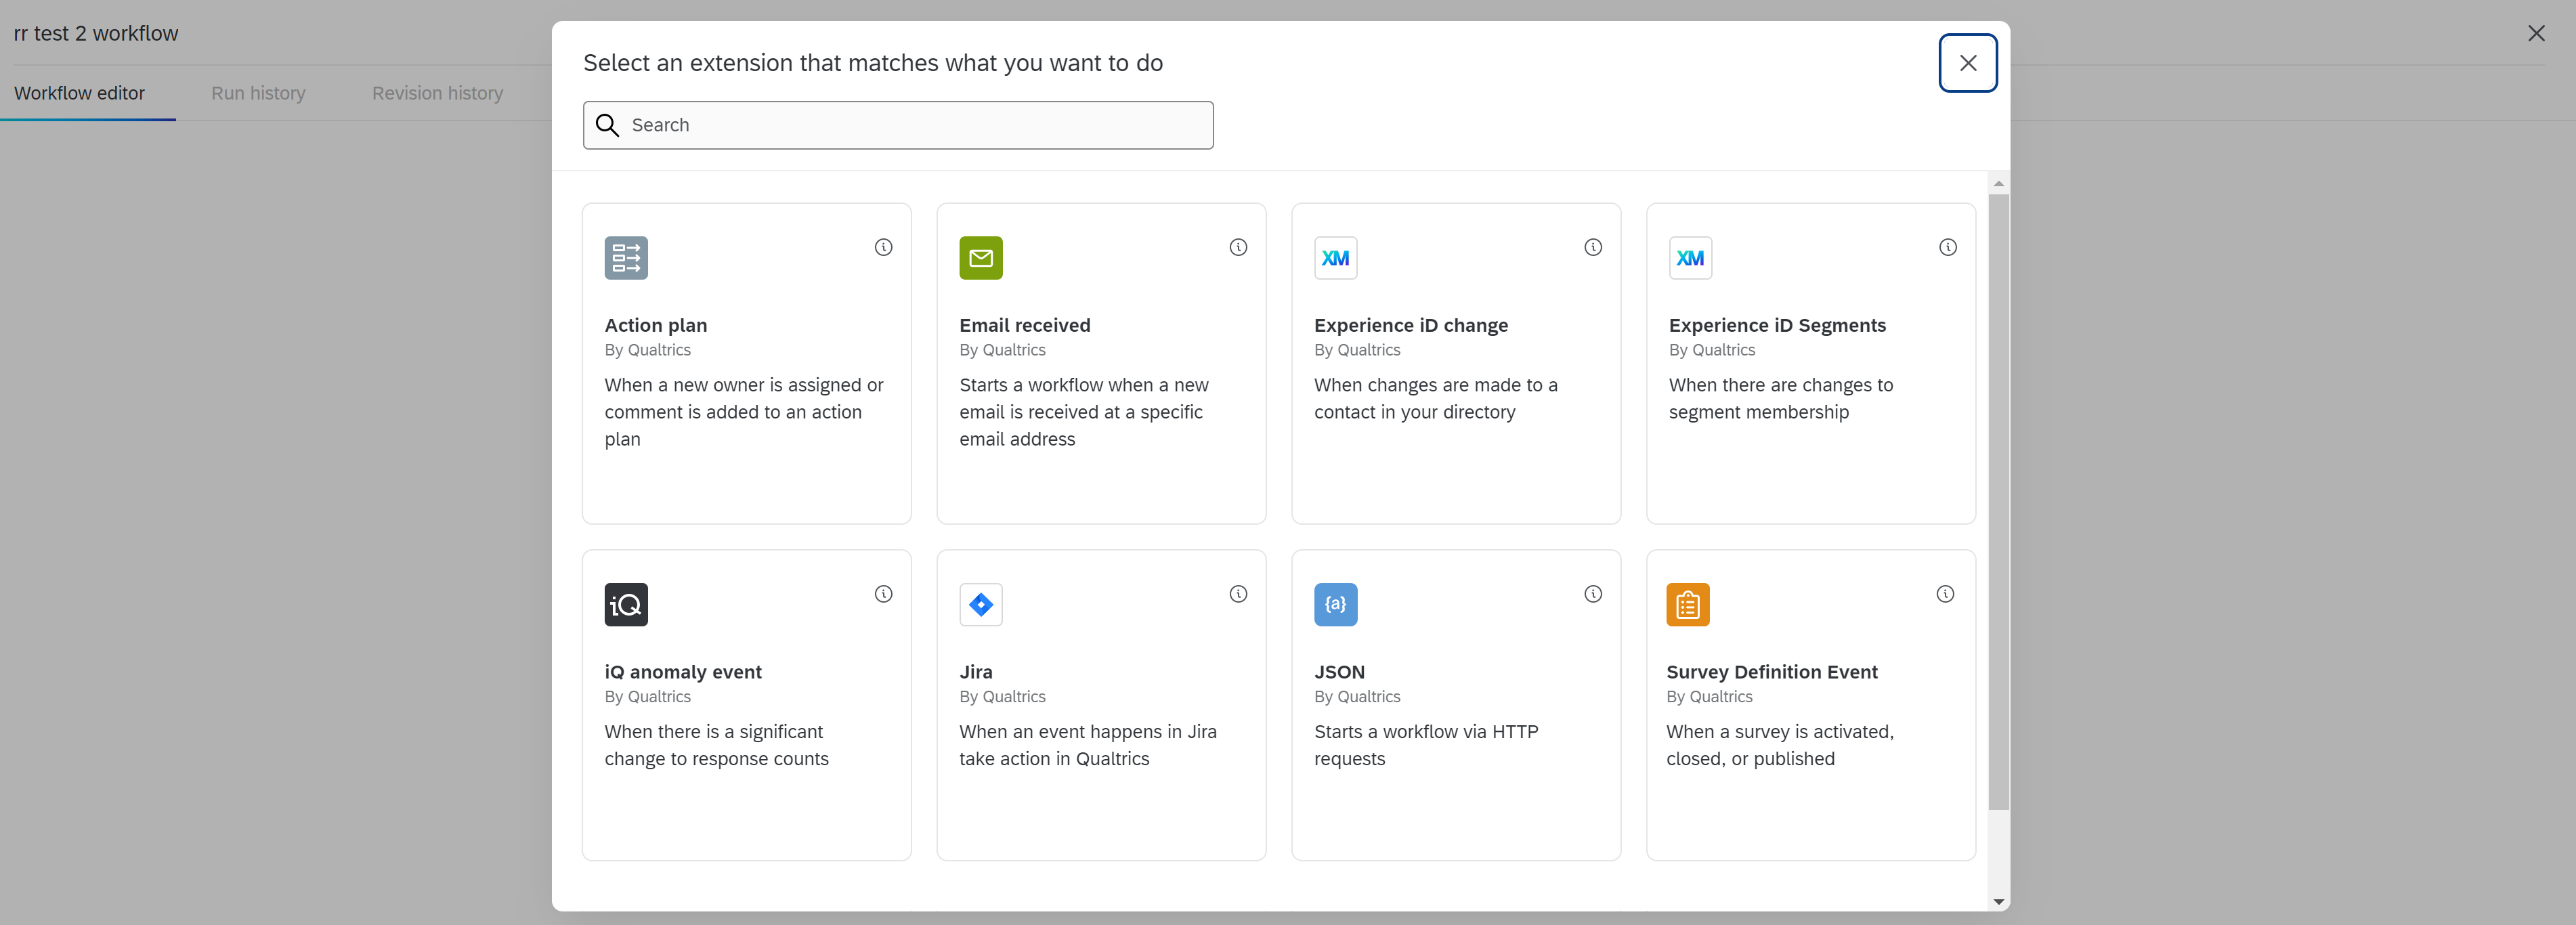
On the Select an extension that matches what you want to do page, select the JSON extension.
-
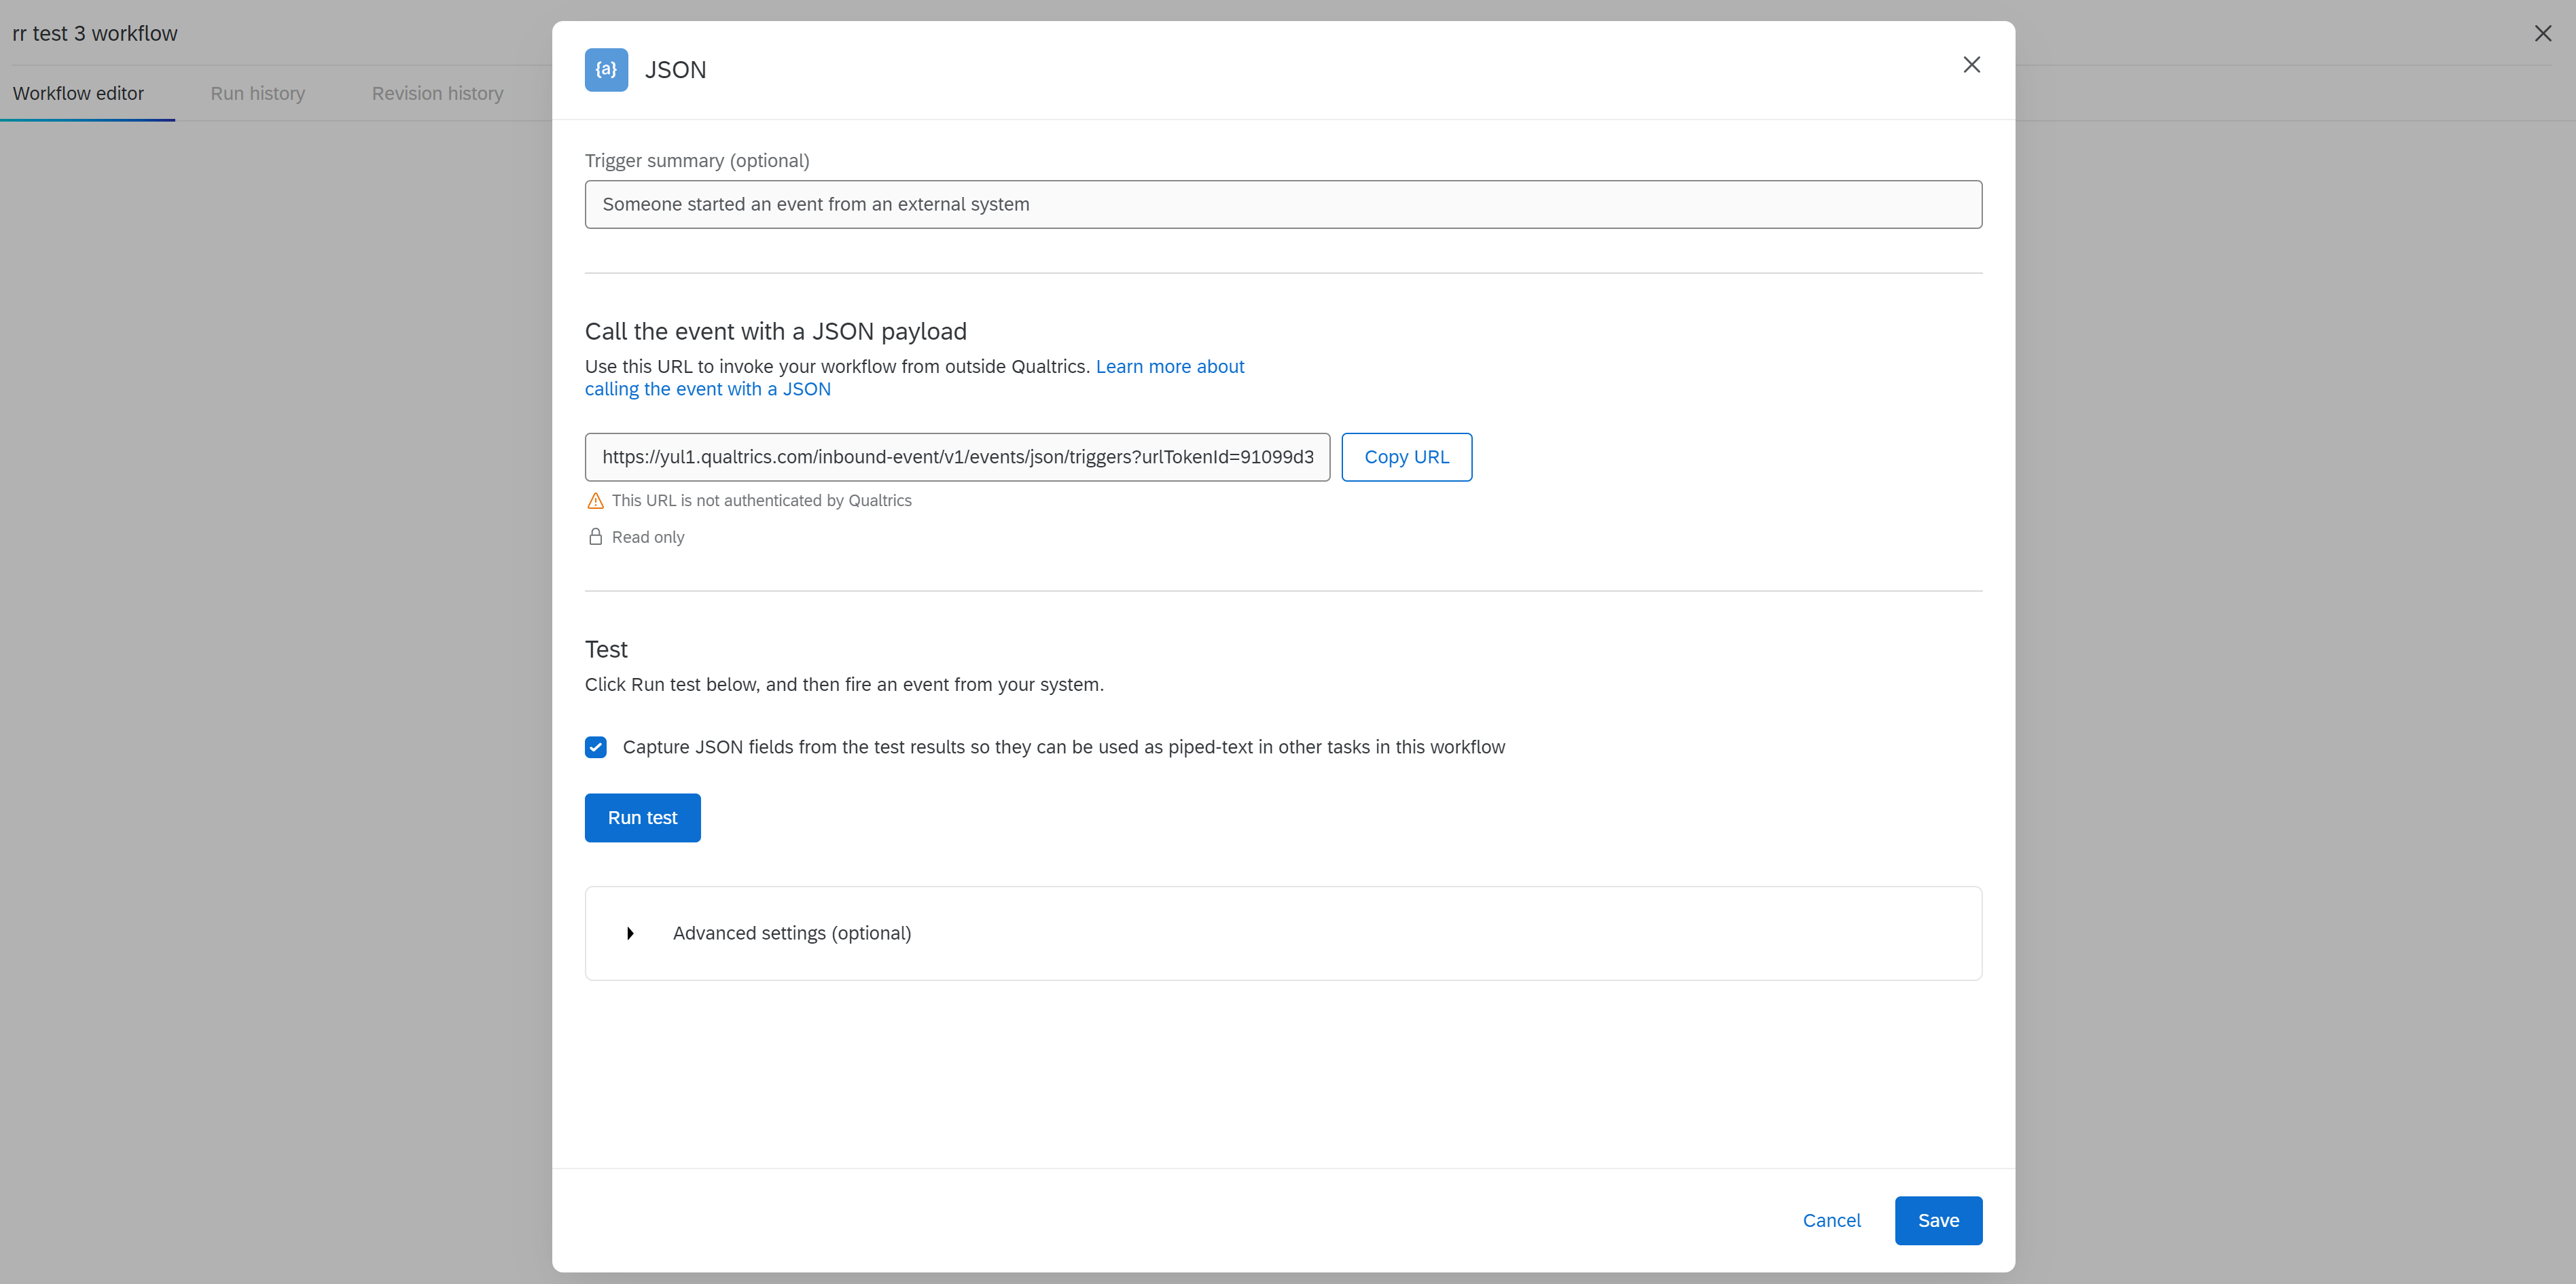
On the JSON page, the field under Call the event with a JSON payload contains the URL that you need to put into the URL field in the Recipient configuration in SysTrack.
-
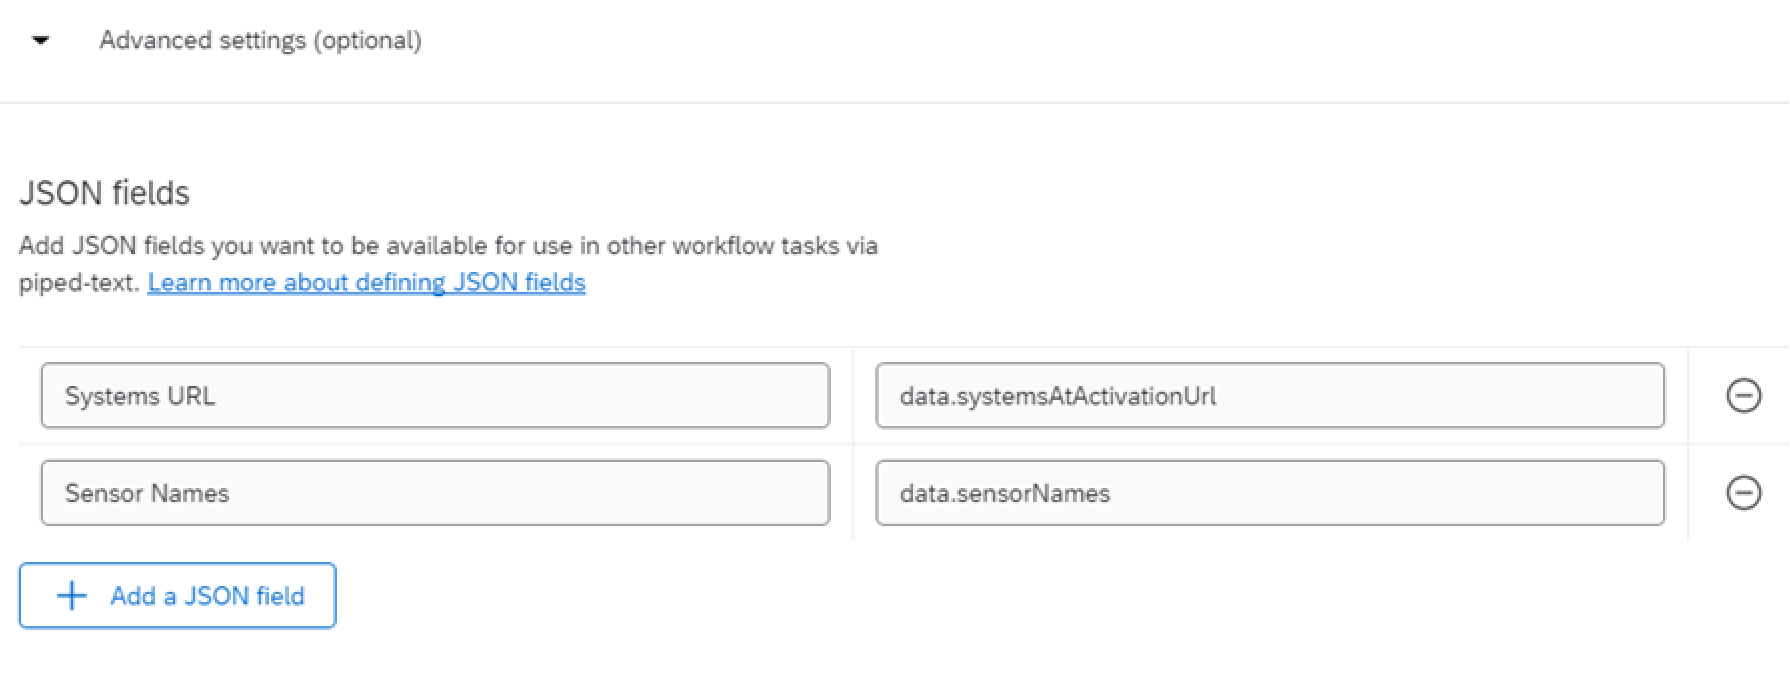
Also on the JSON page, select Advanced settings to show more fields that you need to configure.
-
Under JSON fields, create two fields:
-
For Systems URL, enter data.systemsAtActivationURL.
-
For Sensor Names, enter data.sensorNames.
-
-
Click Save.
Now follow these steps to add a new task to the workflow you just created:
-
On the Workflow editor tab of your workflow, click the + button and select Add a task.

-
On the Select an extension that matches what you want to do page, select the Operational Pulse extension.
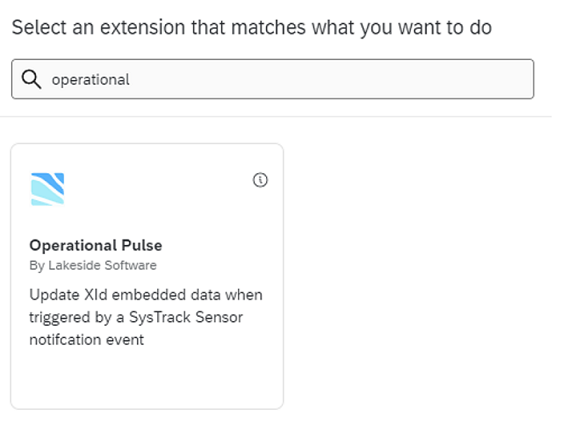
TIP: You must have the Operational Pulse extension installed in Qualtrics in order to see it here. See the Qualtrics documentation for information about how to install extensions.
The Operational Pulse Update Contact Metadata page appears.
-
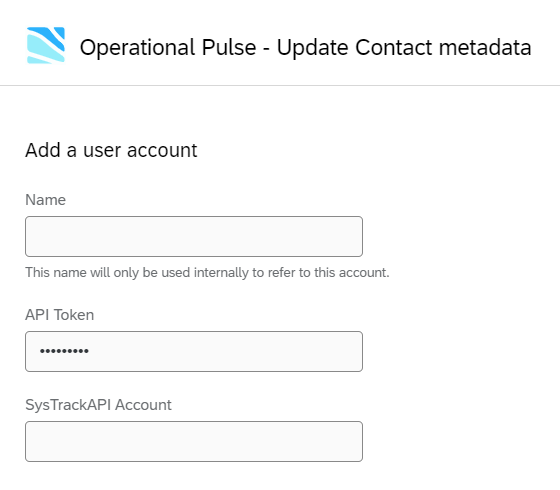
Under Choose account, select Add a user account.
-
Under Add a user account, enter any name you prefer as a Name for the account.
-
For API Token, enter the password for your SysTrack Service Account.
IMPORTANT: The API Token and the SysTrack Username (in the next step) come from the credentials for your SysTrack Service Account. To find the password and username of your SysTrack Service Account, sign into SysTrack as an Administrator. Then under Administration, select Manage Service Accounts. On the Manage Service Accounts page, you can see the Service Account username and access the password.
-
For SysTrack API Account, enter the username for your SysTrack Service Account, and then select Save.
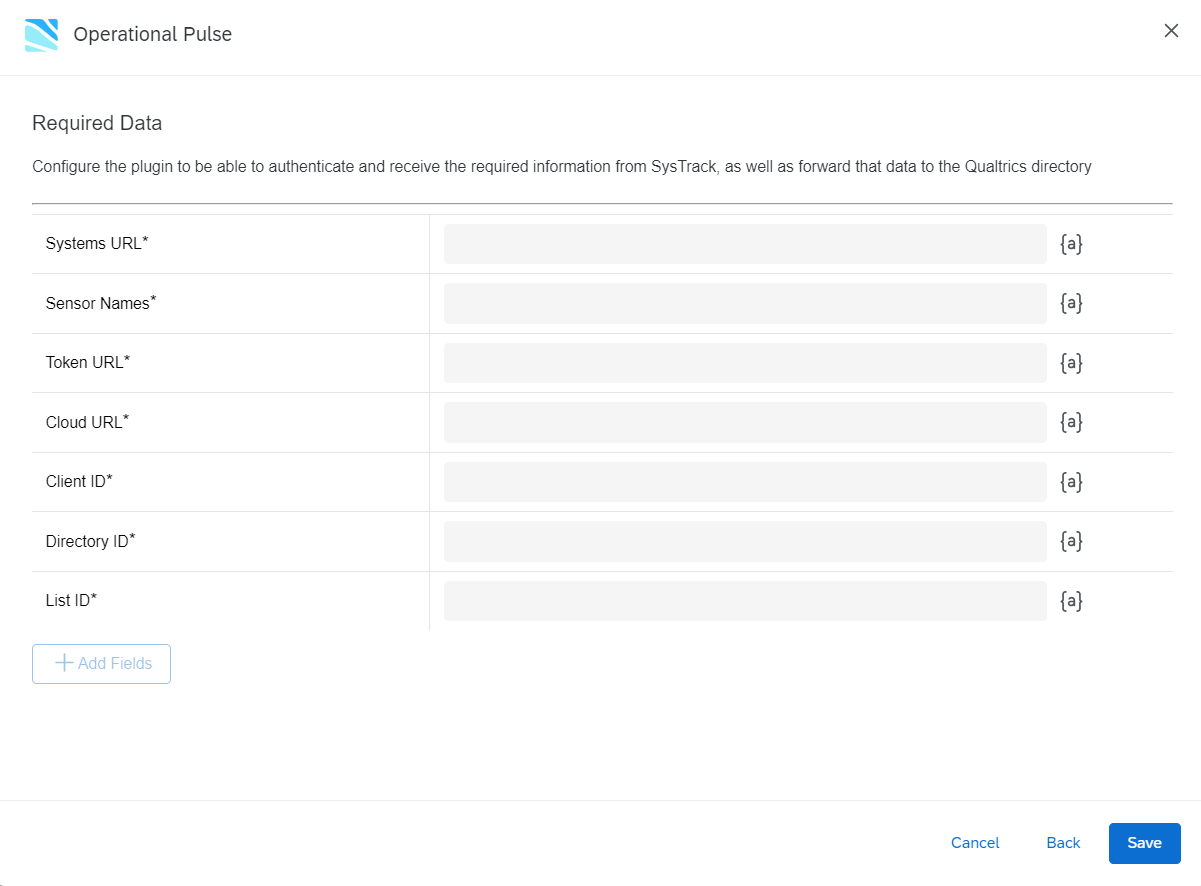
The Required Data page appears.
-
On the Required Data page, select the button next to each field and make the following selections:
-
Systems URL: Systems URL
TIP: This is the System URL that you configure in the previous procedure for the JSON HTTP workflow.

-
Sensor Names: Sensor Names
-
Token URL: To get your Token URL, contact SysTrack Customer Support.
-
Cloud URL: Enter your company's SysTrack cloud URL (for example, cloud.lakesidesoftware.com).
-
Client ID: Enter your Client ID, which you can find on the Tenant Information page in SysTrack.

-
List ID: This is the Qualtrics ID of your list of users. See the Qualtrics documentation for information about how to create this list and get the ID.
-
Directory ID: This is the Qualtrics ID of your directory of users. See the Qualtrics documentation for information about how to create this directory and get the ID.
-
-
Select Save.
Configure the Recipient in SysTrack
The following steps explain how to create the integration's recipient in SysTrack.
The recipient is a SysTrack webhook that allows your data to flow into Qualtrics. Therefore, you need just one recipient for the integration.
Open SysTrack Configure, and follow these steps:
-
In the left menu, under Sensor Configuration, select Notifications.
-
Select Recipients.
-
Select the lock so that you can edit the page.

-
Click the + button to create a new recipient.
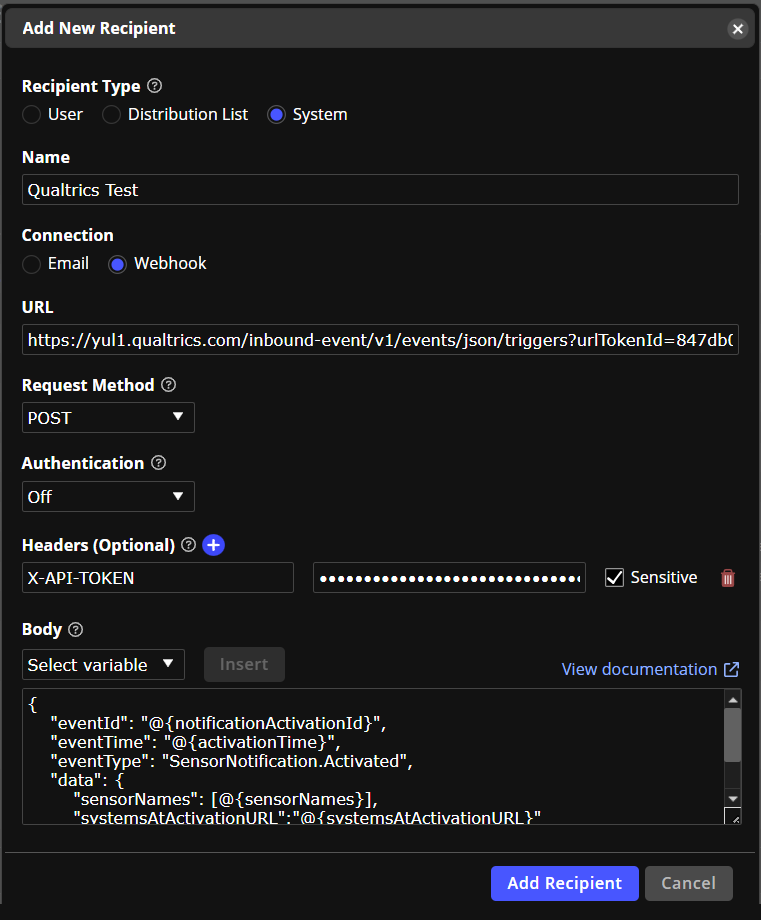
The Add New Recipient dialog box appears.
-
In the Add New Recipient dialog box, complete the settings as follows:
-
For Recipient Type, select System.
-
For Name, enter any name you like.
-
For Connection, select Webhook.
-
For URL, enter the payload URL from Qualtrics. (See this step for explanation on where to find the payload URL in Qualtrics.)
-
For Request Method, select POST.
-
For Authentication, select Off.
-
For Headers, if you are using an authenticated endpoint, enter X-API-TOKEN and also enter your API token. (See the Qualtrics documentation for details on how to create or find your API token.) Make sure to check the Sensitive check box.
-
For Body, copy this variable and paste it into the field:
Copy{
"eventId": "@{notificationActivationId}",
"eventTime": "@{activationTime}",
"eventType": "SensorNotification.Activated",
"data": {
"sensorNames": [@{sensorNames}],
"systemsAtActivationURL":"@{systemsAtActivationURL}"
}
}
-
-
Select Add Recipient.
Configure Surveys in Qualtrics
In Qualtrics, create one or more surveys that you want to send to users when your configured SysTrack sensors are triggered.
NOTE: For each Qualtrics survey you want to send, you need to configure a corresponding notification in SysTrack (as described above in Configure the Notifications in SysTrack).
For the steps to create surveys in Qualtrics, see the Qualtrics documentation.
Configure the Notifications in SysTrack
The following steps explain how to create the integration's notifications in SysTrack.
Open SysTrack Configure, and follow these steps:
-
In the left menu under Sensor Configuration, select Notifications.
-
Select Notifications.
-
Select the lock so that you can edit the page.
-
Click the + button to create a new Notification.
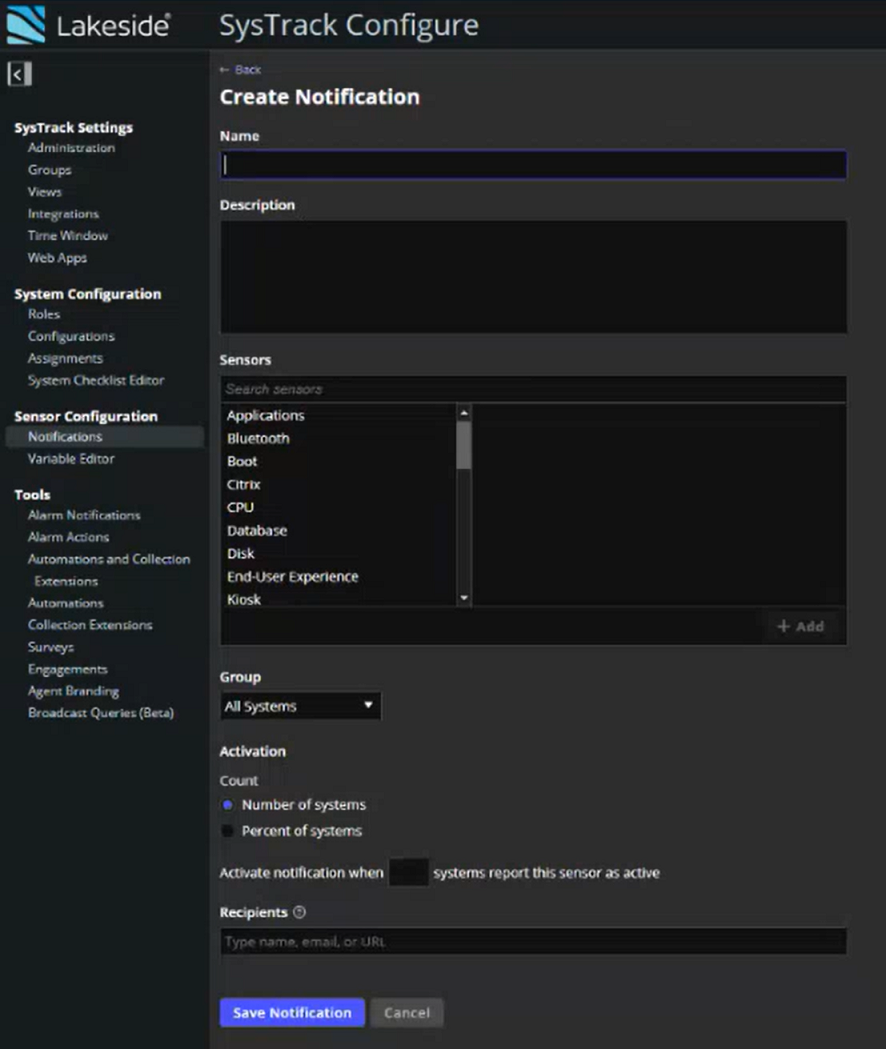
The Create Notification page appears.
-
On the Create Notification page, complete the settings as follows:
-
For Name, enter any name you like.
-
For Description, enter text that will help you remember the purpose of the notification.
-
For Sensors, select the sensors that you want to include, and then select Add.
-
For Group, select the group of systems to which you want this to apply.
-
For Activation, select from the three options based on your use case for the notification.
-
For Recipients, enter the Recipient that you created above in Configure the Recipient in SysTrack.
-
-
Select Save Notification.
Create Qualtrics Workflows for Your Surveys
In Qualtrics, you need to create an Experience ID Change workflow for each survey that you want to send.
NOTE: Keep in mind that, for each Qualtrics survey you want to send, you need to configure a corresponding notification in SysTrack (as described above in Configure the Notifications in SysTrack). You also need to create one Experience ID Change workflow (as described below) for each Qualtrics survey.
Follow these steps to create this workflow:
-
In Qualtrics main menu, select Workflows.
-
Select Create a Workflow, and select Started when an event is received.

-
Enter a name for the workflow, and select Stand-alone workflow for the Location.
-
On the Select an extension that matches what you want to do page, select the Experience ID Change extension.
The Experience ID Change page appears.
-
On the Experience ID Change page, select Contact data change, and select Next.
-
On the next page, under Select an XM Directory, select Default directory, and select the check boxes named Contact data has been updated and Contact data has been created.
-
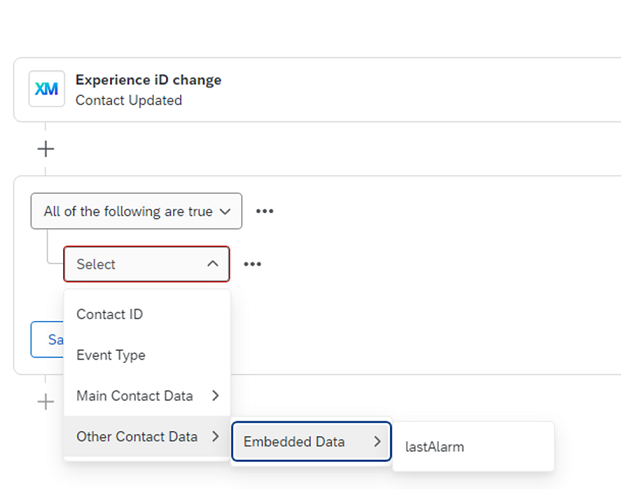
Under Add embedded data fields for your workflow conditions setup, select lastAlarm, and select Save.
-
On the Workflow editor tab of your workflow, click the + button and select Add a condition.
IMPORTANT: The conditions that you add here identify all the SysTrack sensors that must be triggered in order for your survey to be sent to users.
-
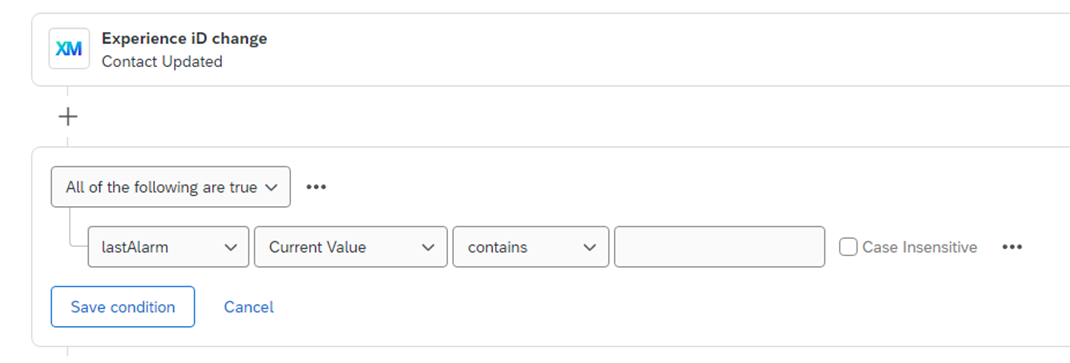
In the first field of your condition, select All of the following are true. Then select the following in the remaining fields:
-
lastAlarm
-
Current Value
-
contains
NOTE: In the text field after contains, add the name of the sensor you specified for this notification.
-
-
Select Save condition.
-
If you have more than one sensor for the survey, select the ... button and select Insert condition below. Add as many conditions as you need so that you include all SysTrack sensors that must be triggered in order for the survey to be sent. This list of conditions must match your SysTrack Sensor Notification list of sensors to work correctly.
-
Select the + button and select Add a task.
TIP: This task configures the sending of your Qualtrics survey.
-
On the Select an extension that matches what you want to do page, select the XM Directory extension.
-
On the Distribute Survey Task page, complete the options as follows:
-
Distribution Type: Individual.
-
Distribution Method: Email / Embedded Data.
-
Link Type: Individual.
-
When: Immediately.
-
Select how you want to save or update info: Save or update it as embedded data to your XM directory contacts.
-
Contact List: Select the contact list that you want to use for sending out the survey.
-
First name: Select Main Contact Data > First Name.
-
Last name: Select Main Contact Data > Last Name.
-
Email address: Select Main Contact Data > Email.
-
Language: Select the language you want to use for the survey.
-
Survey: Select the Survey you want.
-
From Address: Configure as you like for your surveys.
-
From Name: Configure as you like for your surveys.
-
Reply-To Email: Configure as you like for your surveys.
-
Subject: Configure as you like for your surveys.
-
Message: Configure as you like for your surveys.
-
-
Select Save.
On This Page