Schedule Refreshes with the Power BI Service
The following sections explain how to use SysTrack's Power BI Connector with Microsoft's Power BI Service to configure a scheduled data refresh that automatically refreshes your data from SysTrack datasets in Power BI.
After you configure these scheduled refreshes, your reports will always be up to date without manual intervention, so that your team can focus on gaining insights instead of managing refresh cycles.
Before You Begin
Before you start to configure your scheduled refresh in Power BI, make sure you have done the following:
-
Install the SysTrack Power BI Connector.
-
Configure the SysTrack Power BI Connector with API Key authentication, and create your chosen report in Power BI.
-
Ensure that you have a Microsoft Power BI Service license through your organization.
Download Microsoft's Data Gateway
You need to download and install Microsoft's Data Gateway (also referred to in Microsoft documentation as an On-Premises Data Gateway). This Data Gateway securely transfers data from your local Power BI Desktop version to Microsoft's Power BI cloud version (at app.powerbi.com), which is necessary to do a scheduled data refresh.
To install Microsoft's Data Gateway, follow these steps:
-
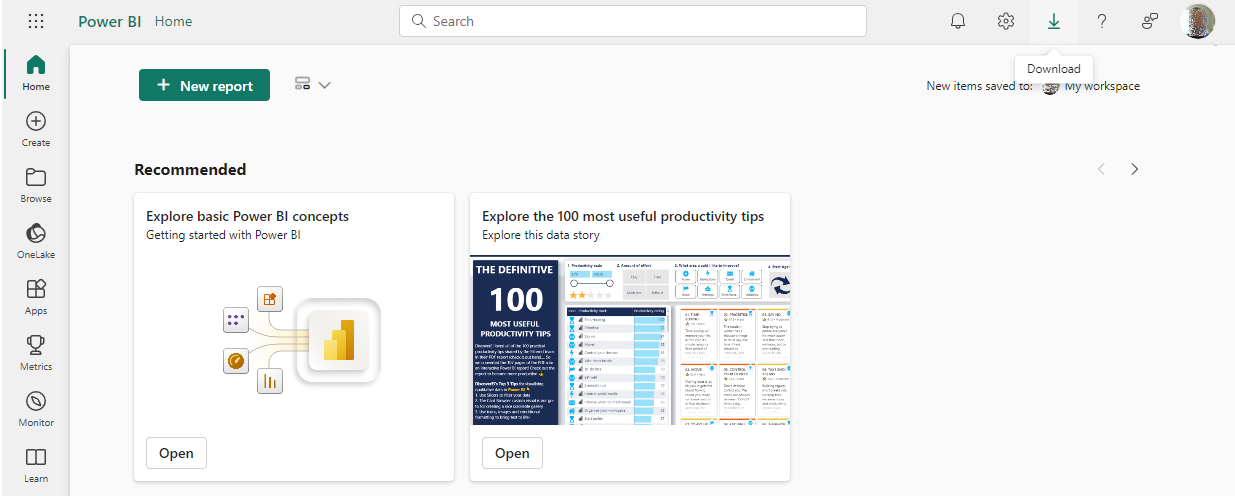
Select Download.
-
From the Download menu, select Data Gateway.
Microsoft's gateway download page opens.
-
Select Download standard mode and save the installer (GatewayInstall.exe).
Install and Configure the Data Gateway
Follow these steps to install and configure the Data Gateway:
-
Run (with Administrator rights) the GatewayInstall.exe file that you downloaded in the previous steps.
-
On the first installer page, keep Install To at the default, and select Install.
-
On the next installer page, enter your email address in the Email address to use with this gateway field, and select Sign In.
IMPORTANT: The email address that you enter must be the one linked to your Power BI Service account. -
On the next installer page, select Register a new gateway on this computer.
-
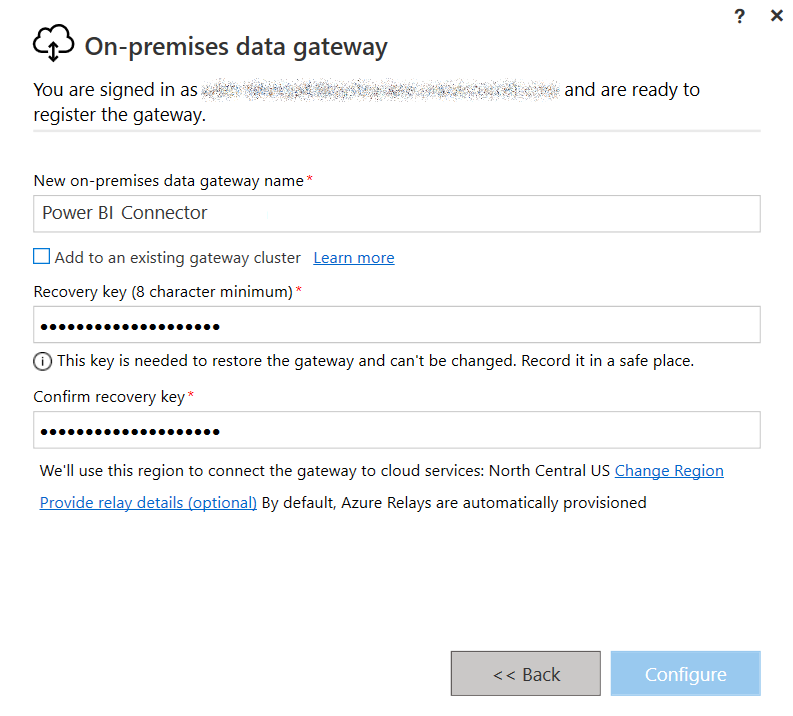
On the next installer page, enter a name in the New on-premises data gateway name field.
-
On the same page, create and enter a key in the Recovery key field. Confirm the key in the Confirm recovery key field. Then select Configure.
TIP: Be sure to add this recovery key to your organization's password management tool so that you do not forget the key and lose access to your gateway. -
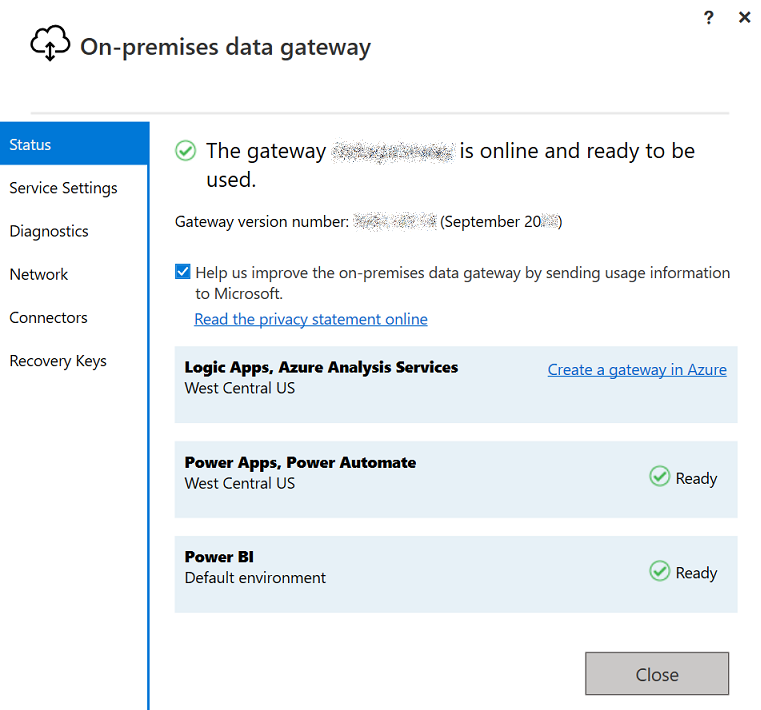
On the next installer page, select the Status tab and verify that it says The gateway is online and ready to be used.
-
On the same page, select the Connectors tab. Verify that LakesidePowerBIConnector is in the Name field.
TIP: If the Name field doesn't show the connector immediately, give it a few seconds to populate the field.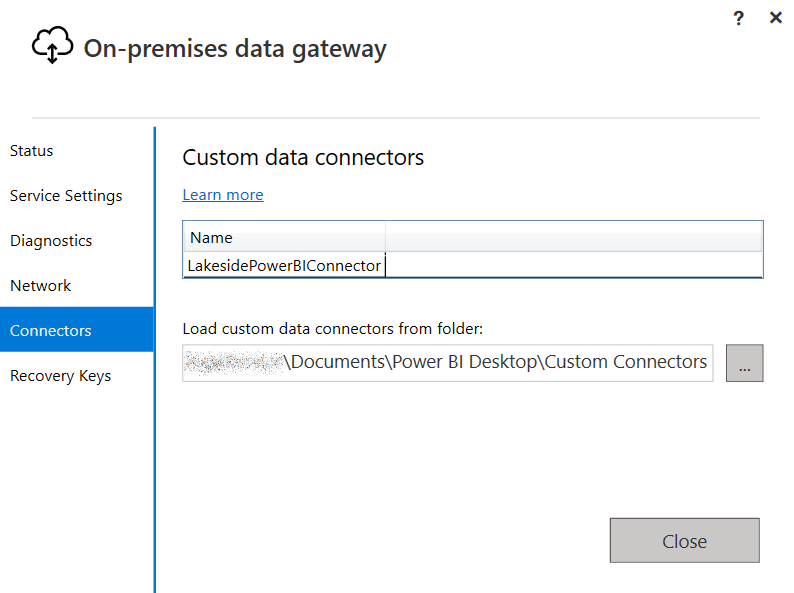
-
Also on the Connectors tab, change the path name in the Load custom data connectors from folder field to be the path you want.
NOTE: This path name might not be correct for you by default. If you have used a previous version of the SysTrack Power BI Connector, for example, you'll want to change this path to point to the latest version of the connector. -
In Windows, navigate to the folder at the path specified in the preceding step. This folder must be accessible by the user that runs the gateway service.
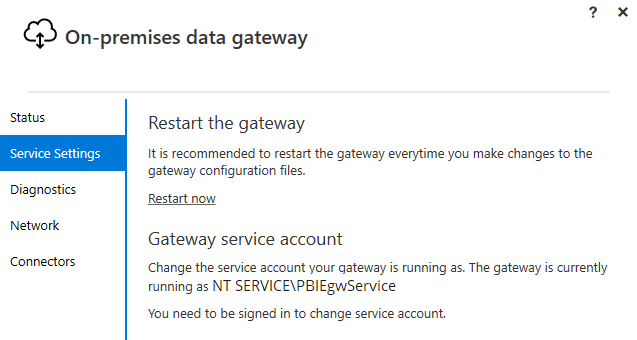
IMPORTANT: By default, this user is NT SERVICE\PBIEgwService. If this user does not have access, you can edit the properties of the folder to add the PBIEgwService user to the list of users who have access.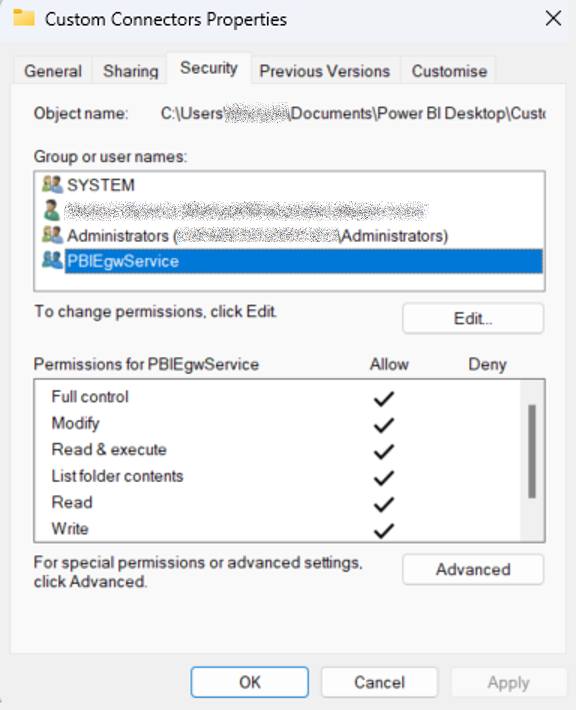 TIP: If you do not make the folder accessible to your gateway user in this step, you will see the error Cannot be added to gateway later when you are configuring the Semantic Model.
 -
On the Service Settings tab, select Restart now to restart the gateway.
Publish Your Report in Power BI Desktop
Make sure that you have already configured the SysTrack Power BI Connector and created your chosen report in Power BI. Now you need to publish your report with Power BI Desktop. Follow these steps:
-
In Power BI Desktop, select Publish.
-
Locate the dataset for the report that you just published.
You might see two types of available data: Report and Semantic Model. Select Semantic Model.
-
For the Semantic Model that you want, select More Options > Settings.
The Settings page for your Semantic Model opens.
-
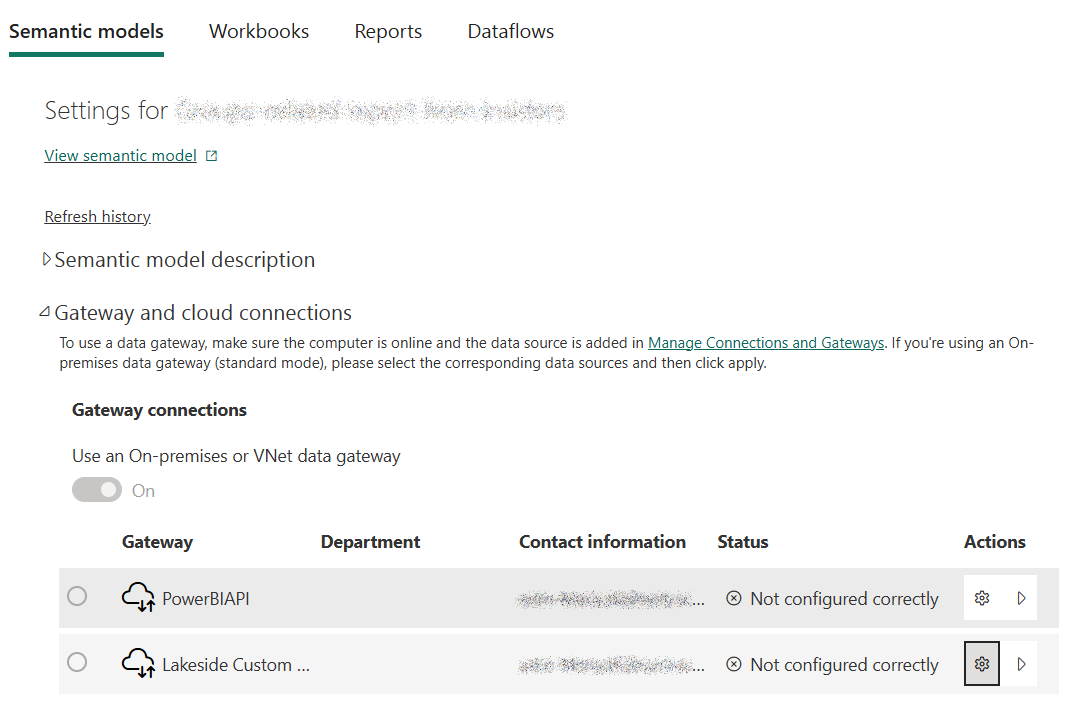
In the Gateway and cloud connections section, select your gateway.
-
If your gateway's status is Not configured correctly, select the gear icon (named Manage Connections and Gateways) in the Actions column.
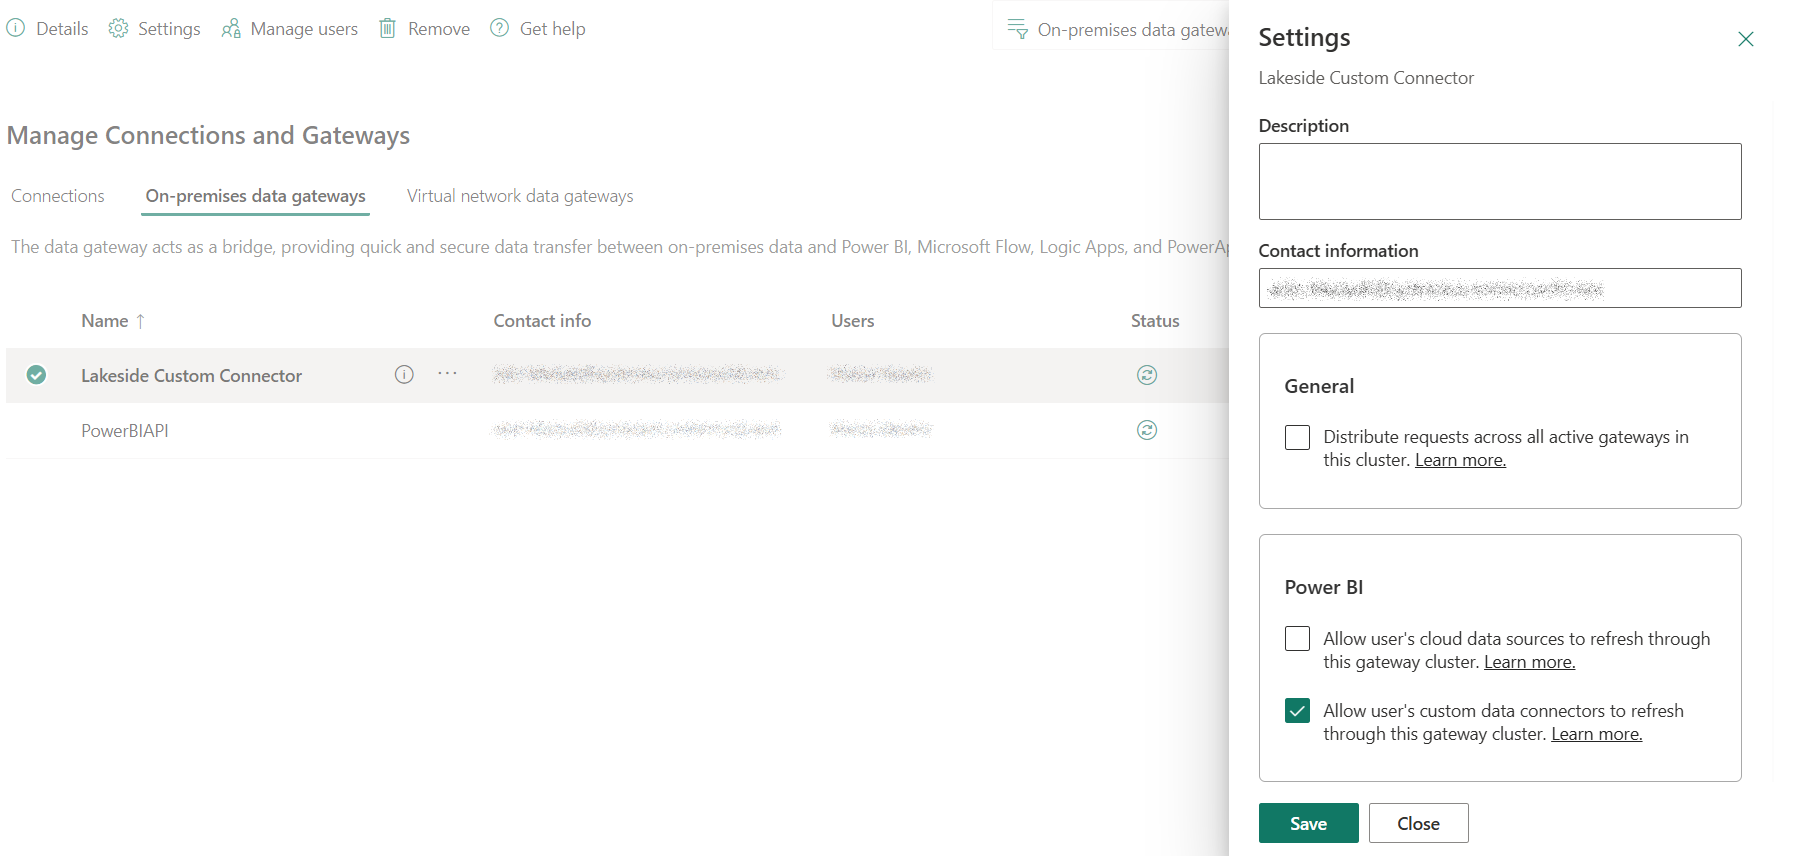
The Manage Connections and Gateways page opens.
-
In the Settings panel on the right, check the check box named Allow user's custom data connectors to refresh through this gateway cluster. Then select Save.
You are back on the Settings page for your Semantic Model.
-
Next to your Semantic Model, select Manually add to gateway.

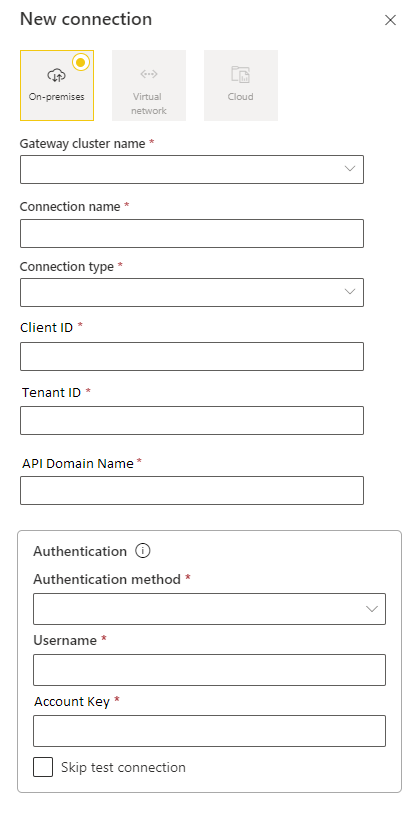
The Managed Connections and Gateways - New Connection page opens.
-
Complete the fields as follows:
-
Gateway cluster name: This should be selected for you by default as the name of the gateway that you created.
-
Connection name: The best practice is to use the name of your tenant and environment for your Connection name.
-
Connection type: Because you are using what Microsoft calls an On-Premises Data Gateway, select On-Premises from this list (if it is not already selected by default).
-
Client ID: Enter the Client ID that you configured for the SysTrack Power BI Connector.
-
Tenant ID: Enter the Tenant ID that you configured for the SysTrack Power BI Connector.
-
API Domain Name: Enter the API Domain Name that you configured for the SysTrack Power BI Connector.
NOTE: If you do not enter the correct Client ID, Tenant ID, or API Domain Name, you will see errors such as the following in later steps:Not configured correctly
Data source error: Scheduled refresh is disabled because at least one data source is missing credentials
-
Authentication Method: Select Key.
-
Username: Enter the same gateway user that you used in previous steps.
-
Account Key: This is the same API key that you configured for the SysTrack Power BI Connector.
NOTE: Make sure to use a valid Power BI Read-Only API key. If you use a key that has expired or has been revoked, you will receive errors in later steps. -
-
Select Create Connection.
-
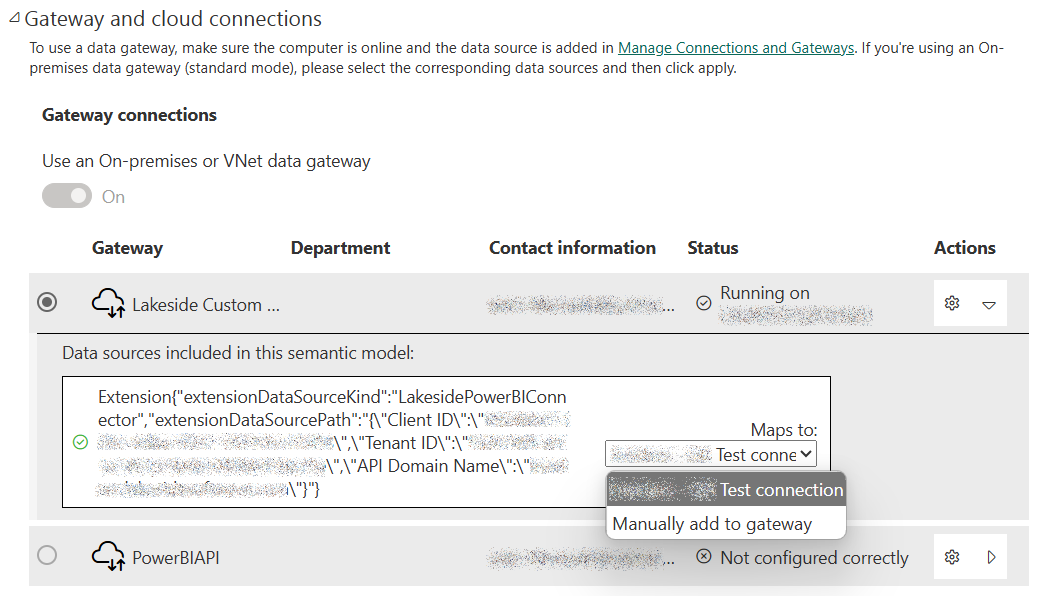
Go back to the Gateway and cloud connections section, and select the connection to map to in the Maps to field.
-
Select Apply.
You see a Success message. You can proceed to the next section to set up scheduled refreshes for your SysTrack data.
Set Up Your Refresh Schedule
Follow these steps to configure your scheduled refreshes:
-
Make sure you are in Microsoft's Power BI cloud version.
-
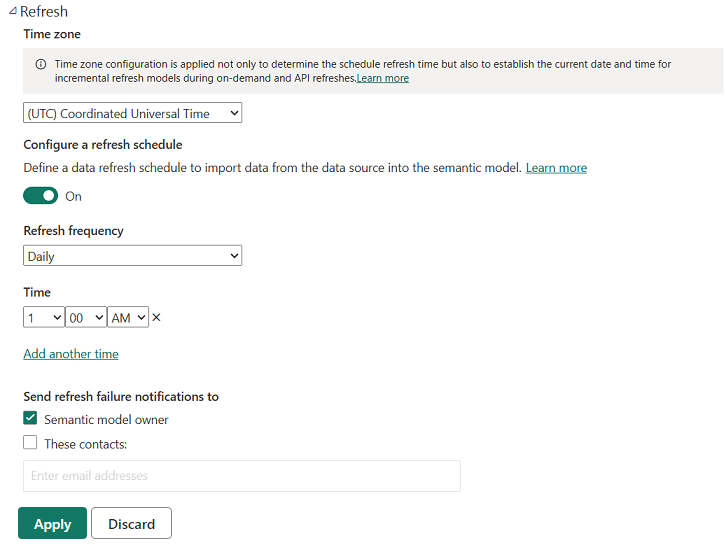
In the settings for your Semantic Model, expand the Refresh section.
-
Under Configure a refresh schedule, set the toggle to On.
-
In the Refresh frequency field, select the frequency you want.
-
In the Time field, select the time at which you want refreshes to occur.
NOTE: Make sure to select a time when you know your gateway will be online. -
Select Apply.
Your data from SysTrack will now be refreshed automatically in your Power BI report on the schedule that you defined.
On This Page