Uninstall Agents
You can uninstall the SysTrack Agent from the client systems in one of three ways:
-
From the Assignments page in SysTrack Configure
-
From SysTrack Deploy
-
By using a command delivered to the client systems through a batch file or start-up script
For assistance with the uninstall process, contact SysTrack Customer Support at support@lakesidesoftware.com.
Uninstall Order
The uninstall order is reverse of the Install Order. Systems Management Agent must be uninstalled before uninstalling Microsoft Visual C++ 2015-2019 Redistributable (x86 and x64).
Uninstall Order: (Opposite of the Installation Order)
-
Systems Management Agent_x32.msi
-
VC_redist.x86.exe – 32-bit and 64-bit operating systems
-
VC_redist.x64.exe – 64-bit operating systems only
Uninstall Methods
There are two uninstall methods to consider: large scale and small scale.
Large Scale
NOTE: We recommend you run large scale uninstalls using your enterprise deployment tool of choice.
This section may be simplified for large scale uninstalls by executing the following command line:
-
On the master system, copy “LsiCins.exe” from the <SysTrack install directory>\Agent\LsiAgent (e.g. C:\Program Files\SysTrack\Agent\LsiAgent) to a network share that all the child systems will have access.
-
Launch the executable with the following command:
LsiCins.exe –forceuninstallSmall Scale
SysTrack Configure - Assignments
SysTrack Agent can be uninstalled in SysTrack Configure - Assignments from Windows machines only. To remove the Agent, select the required system and select the X button next to the drop-down list that contains the system groups filter.
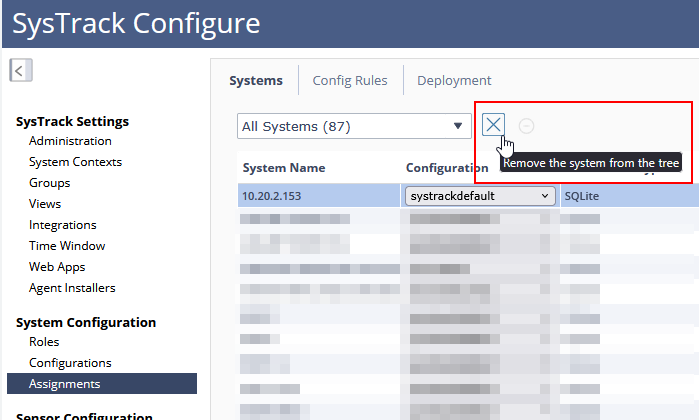
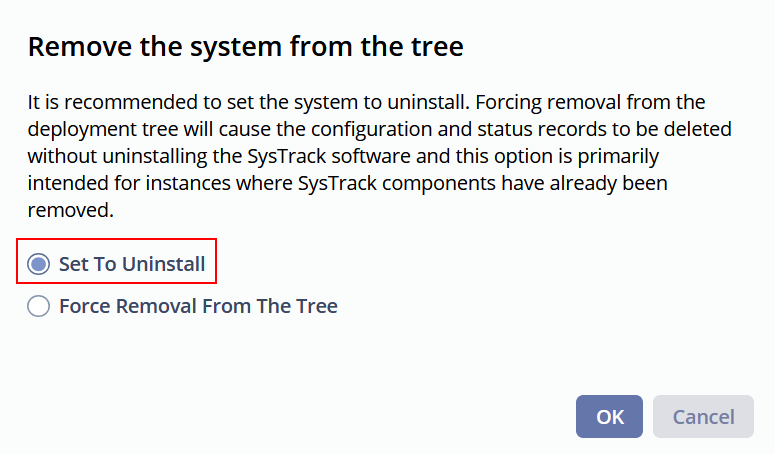
Be sure to select Set To Uninstall in the pop-up window to finish the action:
Command line
The registry contains an entry that defines the command used to uninstall the Systems Management Agent by alternative methods. Browse the entries in this registry location until you find the GUID associated with the Systems Management Agent. After locating it, use the value of the UninstallString registry entry to perform the uninstall.
Entries for both Microsoft Visual C++ 2015–2019 Redistributable (x86) and Microsoft Visual C++ 2015–2019 Redistributable (x64) are listed below.
-
Search registry key to get command line to uninstall Systems Management Agent:
-
(32-bit OS) Registry
Key Value HKEY_LOCAL_MACHINE\SOFTWARE\Lakeside Software\Deploy
Get value of registry value named ChildMsiUninstallString
-Or- HKEY_LOCAL_MACHINE\SOFTWARE\Microsoft\Windows\CurrentVersion\Uninstall\{<GUID>}
Get value of registry value named UninstallString
-
(64-bit OS) Registry
Key Value HKEY_LOCAL_MACHINE\SOFTWARE\Wow6432Node\Lakeside Software\Deploy
Get value of registry value named ChildMsiUninstallString
-Or- HKEY_LOCAL_MACHINE\SOFTWARE\ Wow6432Node\Microsoft\Windows\CurrentVersion\Uninstall\{<GUID>}
Get value of registry value named UninstallString
-
-
Uninstall Systems Management Agent
From the child system, open a command prompt window and enter a command. Depending on the available data, you can do one of the following:
-
Point to the Registry GUID:
CopyMsiexec.exe /qn /x {<Registry GUID goes here>} REBOOT=R /L*v <enter path to an existing temp folder>\silentuninstall.log (logging optional)Examples:
-
No logging:

-
With logging, create temp folder:

-
-
Point to the MSI file, if available:
CopyMsiexec.exe /x <path to msi>\Systems Management Agent_x32.msi REBOOT=RA successful removal log entry appears near the bottom of the log and looks similar to the following:
MSI (s) (18:14) [11:58:36:908]: Product: Systems Management Agent -- Removal completed successfully.
-
-
Uninstall Microsoft Visual C++ 2015-2019 Redistributable (x86)
-
From the child system, bring up a command prompt window and enter the following command. Remember to use the relevant Registry GUID:
CopyC:\ProgramData\Package Cache\{Registry GUID goes here>}\VC_redist.x86.exe" /uninstall /quiet /log %temp%\vc2019x86_uninstall.log
-
A successful removal should create 3 log files. The log entry should appear toward the bottom and look similar to the following:
[0C28:03F0][2020-02-20T11:13:47]i007: Exit code: 0x0, restarting: No
MSI (s) (0C:28) [11:13:46:133]: Product: Microsoft Visual C++ 2019 X86 Additional Runtime - 14.24.28127 -- Removal completed successfully.
MSI (s) (0C:F4) [11:13:47:428]: Product: Microsoft Visual C++ 2019 X86 Minimum Runtime - 14.24.28127 -- Removal completed successfully.
-
Log file names:
-
vc2019x86_uninstall.log
-
vc2019x86_uninstall_000_vcRuntimeAdditional_x86.log
-
vc2019x86_uninstall_001_vcRuntimeMinimum_x86.log
-
-
-
-
Uninstall Microsoft Visual C++ 2015-2019 Redistributable (x64)
-
From the child system, bring up a command prompt window and enter the following command. Remember to use the relevant Registry GUID:
CopyC:\ProgramData\Package Cache\{Registry GUID goes here>}\VC_redist.x64.exe" /uninstall /quiet /log %temp%\vc2019x64_uninstall.log
-
A successful removal should create 3 log files. The log entry should appear toward the bottom and look similar to the following:
[0C28:03F0][2020-02-20T11:13:47]i007: Exit code: 0x0, restarting: No
MSI (s) (0C:28) [11:13:46:133]: Product: Microsoft Visual C++ 2019 X64 Additional Runtime - 14.24.28127 -- Removal completed successfully.
MSI (s) (0C:F4) [11:13:47:428]: Product: Microsoft Visual C++ 2019 X64 Minimum Runtime - 14.24.28127 -- Removal completed successfully.
-
Log file names:
-
vc2019x64_uninstall.log
-
vc2019x64_uninstall_000_vcRuntimeAdditional_x64.log
-
vc2019x64_uninstall_001_vcRuntimeMinimum_x64.log
-
-
-
-
Switch Information:
-
REBOOT=R: to suppress automatic and certain prompts for system restarts.
-
/q – (q)silent mode (no user interaction); (n)no user interface
-
/x – uninstall
-
/L*v – verbose logging (optional): Systems Management Agent_x32.msi only
-
/log – path to create log file: Visual C++ 2019 only
-
-
More Information: http://technet.microsoft.com/en-us/library/cc759262(WS.10).aspx#BKMK_Uninstall
Auto Removal of Systems
Deployment Tool
To enable/set time to remove the non-connecting child system(s) from Deployment Tool tree, run Deployment Tool found on the system where you installed the Administrative Tools.
-
Open the Global Configuration Items
-
Select the menu item: Configuration > Global Configuration Items…
-
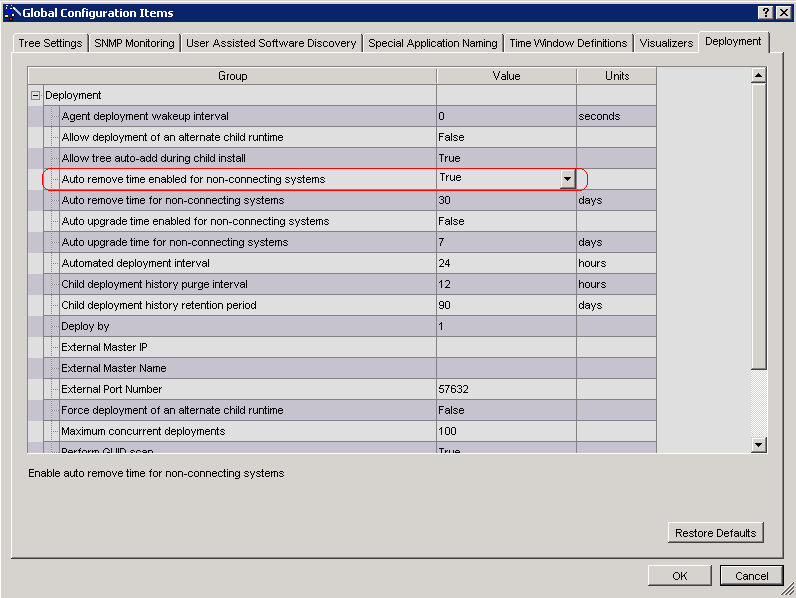
Select the Deployment tab.
-
“Auto remove time enabled for non-connecting systems” set True.
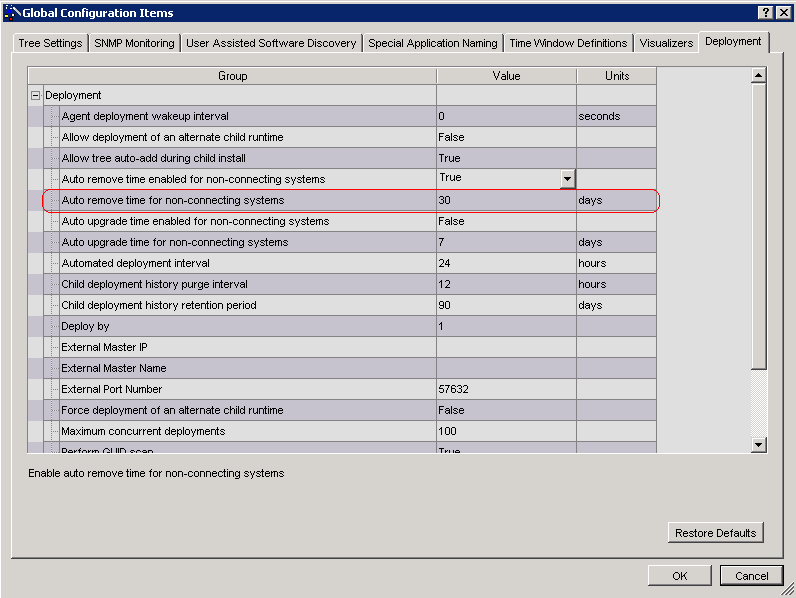
-
Set ‘Auto remove time for non-connecting systems’ to the number of days a system has not connected to the master system before removing system from tree. Default is 30 days.
-
Press the OK button.
SysTrack Configure
You can configure the same setting in SysTrack Configure. Go to SysTrack Configure → Administration → Settings, and use the Auto Remove Non-Connecting System drop-down menu to enable or disable the feature. You can also enter the desired number of days in the text box next to Remove after.

On This Page