Install SysTrack on Android
This section provides instructions for setting up, downloading, and installing the SysTrack Android app on an Android device.
Permissions
Prior to deployment, make sure proper permissions are set for the collection settings. The App Usage permission for app collection is a special access permission which needs to be manually enabled on the device.
NOTE: Android Battery Optimization may cause the agent to stop working in the background. It is recommended that this is disabled for the SysTrack app. You can also configure a policy for the SysTrack application to be exempt from battery optimization through your MDM. The policy should exclude the app bundle org.lakesidesoftware.systrack.
Unique Device Naming
Each Android device running the SysTrack Agent needs to have a unique identifier to distinguish the device from others on the SysTrack Master. When the SysTrack Agent is first configured, the Device Name is established and then saved in the Agent Configuration. If a unique device name was not provided through an MDM deployment or a custom configuration, the SysTrack Agent will default to using the device’s Android ID.
You can view the version and the system name on the SysTrack Configuration page.

You can view the Android ID on the My Device page. The SysTrack Master also allows for a device-friendly name that the SysTrack agent will use, which is listed as the Device Name on the My Device page. You can set this name, for some devices, on the Settings > System > About page.

Set up an SSL Certificate
An uplink connection to an On-Premises Master server requires installation of an SSL certificate on the Android device. The SSL certificate must validate the Master server domain. Cloud installations use a public domain, so they do not require an SSL certificate.
Android devices support standard certificate file extensions and key store file extensions. For more information, see the Work with certificate & key store file types section of the Add & remove certificates Nexus Help article.
To install the certificate on the Android device, copy the certificate file to the device and follow the device-specific instructions. For Android 9 and up, complete the Install a certificate steps in the Add & remove certificates Nexus Help article.
Install from Google Play Store
The SysTrack app is publicly available through the Google Play Store.
-
Open the Google Play Store app and search for the Lakeside SysTrack app.
-
Tap the Install button.
-
The SysTrack app will download and install on the Android device.
-
After installation, tap Open from the Play Store, or tap the SysTrack icon in the App Drawer.
Agent Configuration
Once the SysTrack app is installed, the Configure page can be used to set up a connection with the Master server. An on-premises Master connection requires an SSL certificate installed to validate the Master server domain (see Install SysTrack on Android).
NOTE: To access the Master server from the Android device via mobile or WiFi, the Master server must be public facing to the Internet or within a VPN. If behind a VPN, the Android device must be connected to the VPN to establish a connection with the Master server.
The following steps can be used to configure the Master connection and start the collection agent service.
-
Open the SysTrack app.
-
Tap Configure.
-
Click OK after you have read what data is and is not collected.

-
Go through the Permissions settings (for details. see Android Agent Overview).
-
Check or clear the settings.

-
Enter one of the following for the Master Connection:
-
FQDN (Master account)
-
IP (Internet Protocol)
-
Cloud URL
-
-
(Optional) Enter a User Account Name for the primary device user.
-
(Cloud installation only) Enter the Cloud Tenant ID.
-
Tap Done.
-
The Agent service will then begin and establish a connection with the Master server.
-
The SysTrack app will return to the Main Activity page when configuration is done.
-
A status pop up will indicate the service has begun.
-
A SysTrack notification will appear in the Android notification drawer.
-
-
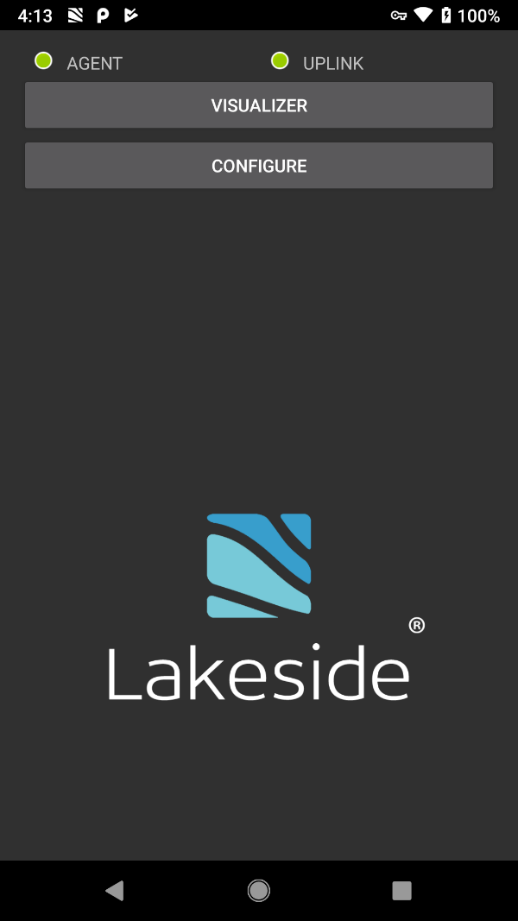
At the top of the Main Activity page are two SysTrack status icons:
-
AGENT – The background collection service is running.
TIP: The collection service can run without an uplink connection. SysTrack will upload data that has been collected offline the next time the uplink connection is established.
-
UPLINK – The uplink connection to the Master server is established.
-
-
If the uplink connection fails to establish and the status remains gray, check that the VPN is connected and the SSL certificate is installed.
Start the Agent
After configuring the SysTrack Agent, the background collection service will start automatically in the following cases:
-
Upon completion of the SysTrack Agent configuration
-
On device unlock, after a device reboot or power on
-
Launching the SysTrack App
The SysTrack Agent will remain running in the background even if the SysTrack app is closed. To stop the SysTrack Agent, perform a Force Stop on the SysTrack app from the app info page.
Uninstall the Agent
To uninstall the SysTrack app from a device:
-
Open the Google Play Store app and search for the Lakeside SysTrack app.
-
Select the SysTrack app.
-
Tap Uninstall.
On This Page