Provision Packages
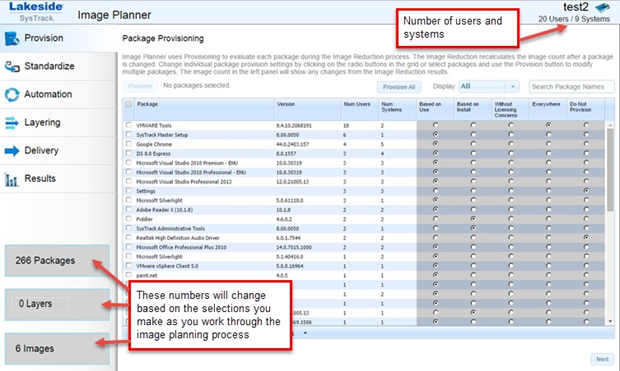
After you have created a model the current package provisioning plan is displayed on the Provision tab. Provisioning in Image Planner means that a package should be included on an image.SysTrack Image Planner uses the settings on this tab to evaluate what to do with each package when defining the images.
When the model is created, Image Planner automatically provisions all packages based on certain algorithms. For example, packages with zero users are set to Based on Installed, while Windows 8 Store apps are tagged as Do Not Provision. All others are set to Based on use.
-
Click on a column name to sort from highest to lowest.
-
You can use the following options to modify default settings as needed:
Option Description Package The list of all packages found on the systems included in this model. Version Package version Num Users The number of observed users for each package. If this column is blank SysTrack could not determine the number of users for this package. Num Systems The number of systems with the package installed Based on Use Based on the usage of the package it will be included in the overall plan and play a role in calculating the image count. Based on Install Based on the package installation status on systems it will be included in the overall plan and play a role in calculating the image count Without Licensing Concerns The package will be marked as having limited licensing concerns (or costs). Similar to Provision Everywhere, except that the package will only be installed on images where at least one system uses the package. If it is the only application preventing two or more images from being consolidated it will be assigned to each to reduce the total number of images.
NOTE: A package might have a licensing cost, but it could still be marked Without Licensing Concerns if it is determined that an incurred cost is worth the tradeoff of a lower image count.
Provision Everywhere Package will be assigned to all images and it will not impact the final image count. Do Not Provision Not provisioned on any image.
Provision Individual Packages
-
Select the packages you wish to provision either by selecting the check box to the left of each package you wish to provision.
Using the check box to the left of the Package column header at the top left of the grid will only select rows that are on the current page.
-
Optionally use the appropriate dynamic radio buttons to the right of a particular package (Based on Use; Based on Install; Without Licensing Concerns; Provision Everywhere).
-
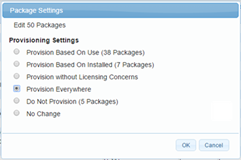
Click the Provision button at the top left. The Package Settings dialog displays.
-
If you wish to change the Provisioning Settings, select the appropriate radio button to the left of the desired option.
-
Click the OK button to provision packages.
Provision Multiple Packages
-
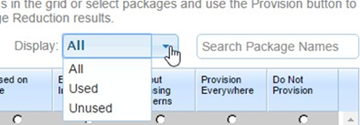
Use the Display filter drop-down menu and choose to display All, Used, or Unused packages.
-
If you want everyone to have a particular version of a package installed (such as Microsoft Office 365), use the Search Package Names field to filter the list of packages, select the check box to the left of the specific package, and then click the Provision All button to mark it to be provisioned everywhere.
-
Optionally use the appropriate dynamic radio buttons to the right of a particular package (Based on Use; Based on Install; Without Licensing Concerns; Provision Everywhere) for a particular package.
-
Click the Provision Al, Provision Used, or Provision Unused button (depending on your choice of filter) to the left of the Display field to provision all the packages that meet the Display criteria.
On This Page