Management
Under Sensor Configuration, the Management page enables you to manage all your sensors in one convenient location. You can search, filter, and sort to find and manage your sensors. You can also easily add sensors to Self-Help and Checklists. You can update the visibility of Sensors in bulk.
To manage sensors, go to Configure and follow these steps:
-
In the left menu, under Sensor Configuration, select Management.
-
If you plan to edit items, select the lock so that you can edit the page.
If you plan to view, search, sort, or filter, you can do those things without selecting the lock.

The following sections explain more features of the Management page.
View a List of All Sensors
Follow these steps to view a list of all sensors:
-
In the left menu, under Sensor Configuration, select Management.
-
At the top of the page, select All Sensors.

View a List of Sensors Used in Self-Help
Follow these steps to view a list of sensors used in Self-Help:
-
In the left menu, under Sensor Configuration, select Management.
-
At the top of the page, change All Sensors to Self-Help.
View a List of Sensors Used in System Checklists
Follow these steps to view a list of sensors used in System Checklists:
-
In the left menu, under Sensor Configuration, select Management.
-
At the top of the page, change All Sensors to System Checklist.
View a List of Sensors Used in Assist - Detected Issues
Follow these steps to view a list of sensors used in Assist - Detected Issues:
-
In the left menu, under Sensor Configuration, select Management.
-
At the top of the page, change All Sensors to Assist - Detected Issues.
Sort the List of Sensors
Follow these steps to sort the list of sensors:
-
In the left menu, under Sensor Configuration, select Management.
-
Select any column to sort the list by that column:
-
Visibility
-
Sensor Name
-
Affected
-
Category
-
Severity
-
Last Modified
-
Last Modified By
-
Filter the List of Sensors
Follow these steps to filter the list of sensors:
-
In the left menu, under Sensor Configuration, select Management.
-
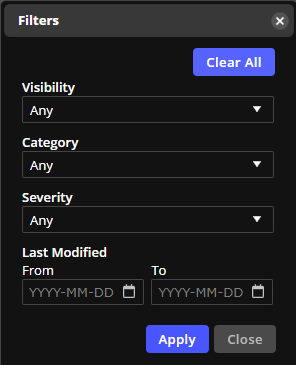
At the upper right of the page, select the Filter button.
The Filters dialog box appears.

-
Select an option to filter by, and select Apply.
Search for a Sensor
Follow these steps to search for a Sensor:
-
In the left menu, under Sensor Configuration, select Management.
-
At the upper right of the page, type your search terms into the Search box.
The Search refines the list as you type your search terms.
View or Edit a Sensor's Details
Follow these steps to view or edit the details of a Sensor:
-
In the left menu, under Sensor Configuration, select Management.
-
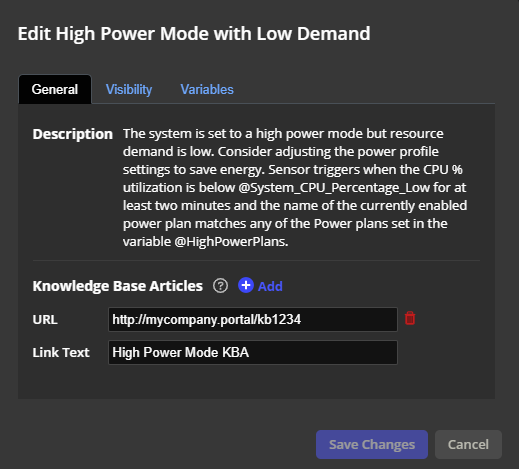
Click a Sensor Name from the list. A dialog box appears in which you can view or edit the details.
-
In the General tab you will see a description of the sensor.

-
You can add Knowledge Base Articles (KBAs) to the sensors with a URL and text.
-
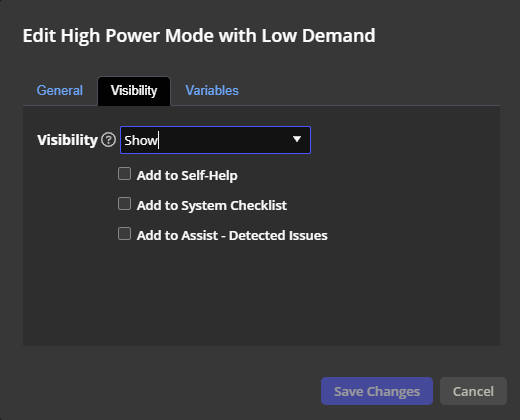
Click the Visibility tab to view or edit the options to Show, Hide, Add to Self-Help, Add to System Checklist, and Add to Assist - Detected Issues.

-
If you want to edit a setting, select the lock so that you can edit the page.
-
Make your edit and select Save Changes.
NOTE: When you are done making changes and want to leave the Sensors page, click the Update Sensor Configuration button (at the top of the page) to apply all of the changes you made to your Sensor Configuration. If you make changes and start to navigate away without using the Update Sensor Configuration button, the system prompts you so that you do not lose any changes.
Edit a Sensor Variable's Value
Follow these steps to edit a Sensor Variable's value:
-
In the left menu, under Sensor Configuration, select Management.
-
Select the lock so that you can edit the page.
-
Click a Sensor Name from the list. A dialog box appears in which you can view or edit the details.
-
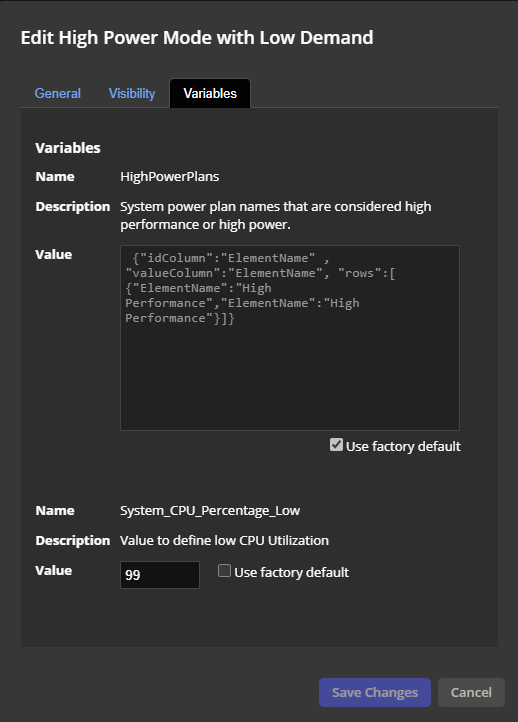
Under the Variables section, you see the Name, Description, and Value for each of the Sensor's Variables.

-
In the Value fields, you can edit a Variable's value.
-
Select Save Changes.
NOTE: When you are done making changes and want to leave the Sensors page, click the Update Sensor Configuration button (at the top of the page) to apply all of the changes you made to your Sensor Configuration. If you make changes and start to navigate away without using the Update Sensor Configuration button, the system prompts you so that you do not lose any changes.
Edit Sensors in Bulk
With the check boxes on the Management page, you can make changes to your sensors in bulk.
Follow these steps to edit sensors in bulk:
-
In the left menu, under Sensor Configuration, select Management.
-
Select the lock so that you can edit the page.
-
Select the check box next to each sensor that you want to edit. If you filter or search to limit the list to only the sensors you want to edit, select the All check box at the top of the check box column to select all of the listed sensors.
-
At the top of the page, select Bulk Actions.
-
From the Bulk Actions menu, select an action to perform on all the sensors you have selected. The available actions are:
-
Hide makes the sensor unavailable globally.
-
Show makes the sensor available globally.
-
Add to Self-Help allows the sensor to be displayed in Self-Help.
-
Add to System Checklist allows the sensor to be displayed in System Checklists.
-
Add to Assist - Detected Issues allows the sensor to be displayed in Assist if the sensor is active.
TIP: If you have selected a subset of sensors, and then you select multiple sensor check boxes to make a bulk change, the Bulk Actions menu only allows the Actions that make sense for that subset. For example, if you are viewing the Self-Help subset, the only option available in the Actions menu is Remove from Self-Help. In order to see all the available Actions options, switch out of the subset and view All Sensors in the list.
-
-
Select the button in the system prompt to verify that you want to make the changes. For example, if you are changing sensors from Hide to Show, the prompt displays a Show Sensors button to verify.
NOTE: When you are done making changes and want to leave the Sensors page, click the Update Sensor Configuration button (at the top of the page) to apply all of the changes you made to your Sensor Configuration. If you make changes and start to navigate away without using the Update Sensor Configuration button, the system prompts you so that you do not lose any changes.
On This Page