Create Automations
Prerequisites
An Automation includes a package of approved scripts (Actions), as well as a configuration that defines when and how those scripts are executed on an endpoint device. An Automaton can be set to run automatically when a sensor triggers (using a Tool Schedule), run manually by the end user (through Self-Help), or it can be run by a member of the IT team using Assist, Resolve or Prevent.
You can create your own Actions, or you can import Kits that contain Actions. Some factory Actions are also supplied with automation definitions.
To create your own Action, see the Create Actions article.
All Actions must be approved and enabled at Configure > Automations and Collection Extensions > Action Governance. See the below articles for guidance:
NOTE: The configuration that contains the new Action must be pushed down to the Agent in order for the Automation to run. You can do this at Configure > Administration > Select the machines > Read Configuration if you wish to expedite the configuration being read by an Agent.
Creating the Automations
IMPORTANT: Make sure you enabled editing by clicking the lock icon in the top-right part of the screen.
-
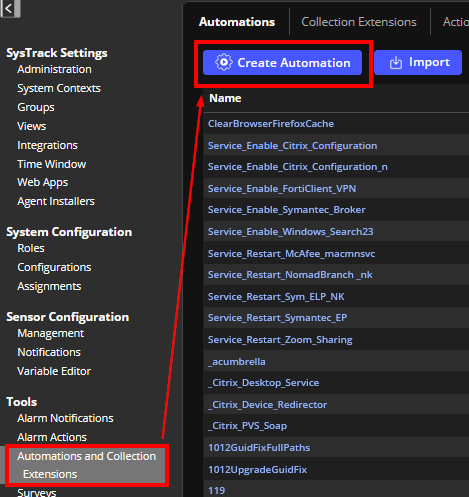
Go to Configure > Automations and Collection Extensions > Automations and click Create Automation
-
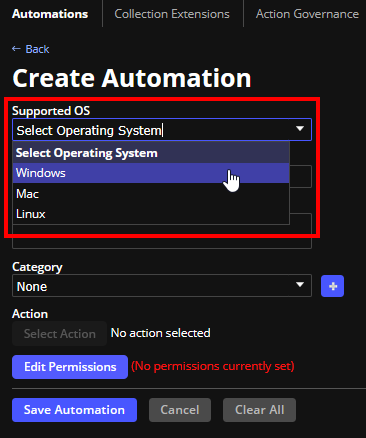
Select the Supported OS from the list. Choices are Windows, Mac, or Linux.
-
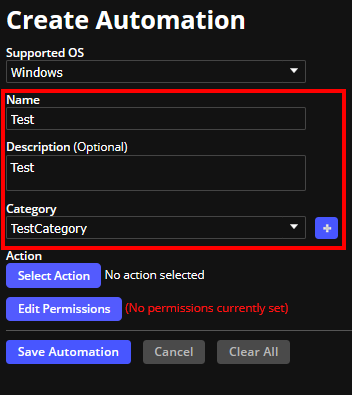
Enter the Name for the automation.
-
(Optional) Enter a description of the automation.
-
(Optional) Choose a Category from the drop-down list or create a new one using the button next to the list. The Category drop-down is pre-populated with existing sensor categories. If your desired category is not listed, it means no other automation currently uses this category. You will need to create it again by clicking the + button to the right of the Category drop-down.
-
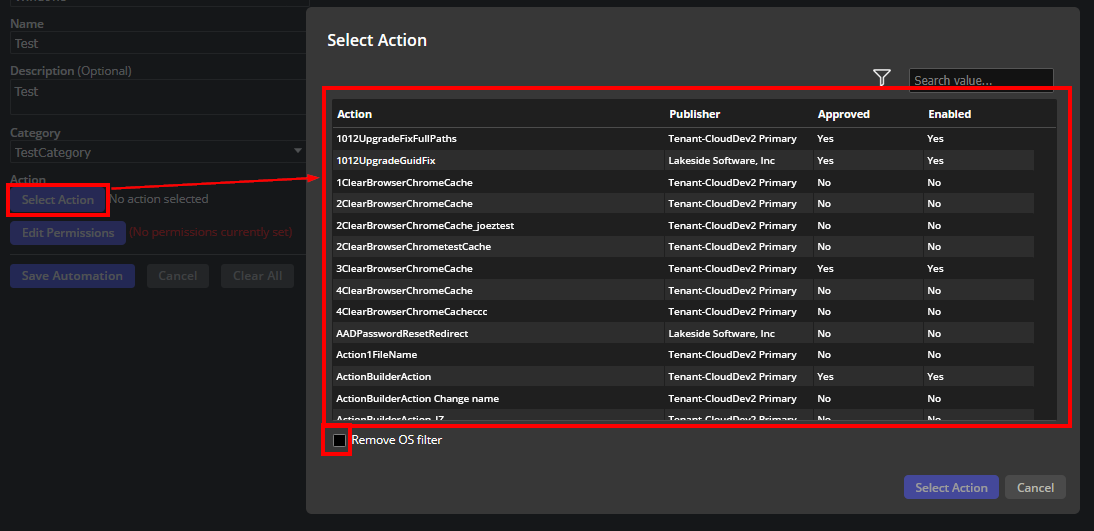
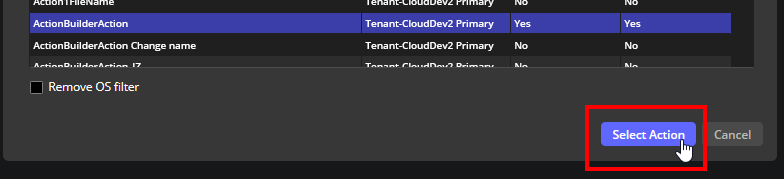
Click Select Action which opens up a filtered list of actions specific to the operating system that you chose.
NOTE: If you want a complete list of all available actions for all operating systems, click Remove OS filter in the lower left corner.
-
Choose the action and click Select Action.
-
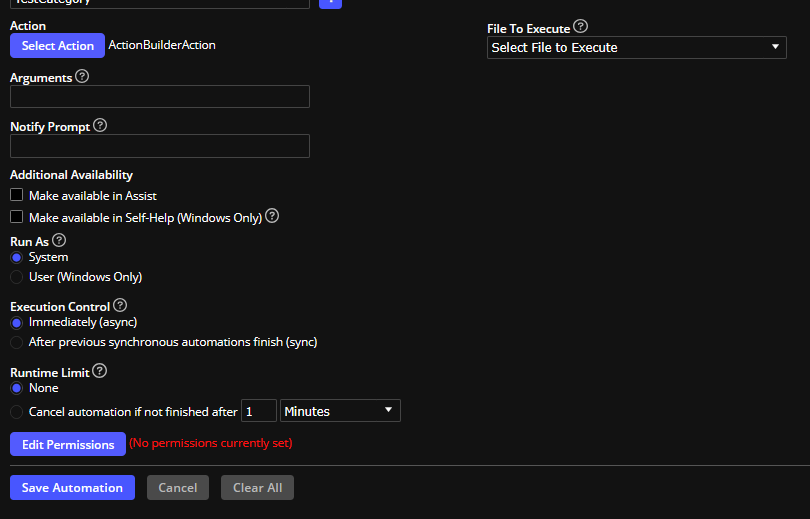
The Automation shows the information that is specific to the operating system.
-
File to Execute - The file to run. If there are multiple executables in the action choose the required file.
-
Arguments - If your action is configured with required or optional parameters you can enter arguments separated by spaces. The following characters are not allowed in an argument: | ; &
-
Notify Prompt - This is the text that is shown to the user if the tool schedule is configured to notify.
-
For Additional Availability, you can enable Make available in Assist or Make available in Self-Help (Windows Only) when you check the box.
NOTE: Actions that require arguments can not be used with automations that are published for Self-Help. If you provide an optional argument, that automation will not be available in Self-Help.
-
Run As - This setting controls whether the file that will be run is by System or the logged in User (Windows Only).
IMPORTANT: Starting from version 11.7, relative paths no longer work for User-context scripts. Use absolute paths or registry-based resolution to load SysTrackPS.dll. For details, see Loading SysTrack PowerShell Module in User-Context Scripts.
-
Execution Control - These settings control how the file to be executed is run on the system.
If you choose Immediately (async) your Runtime Limit options are None or Cancel automation if not finished after x Minutes or Seconds. If you decide to run immediately, you can either have no time out (none) or set a time out value.
If you choose After previous synchronous automations finish (sync) your Runtime Limit options are Use Configuration defined Max Execution Time and Only applicable if limit is less than configuration defined Max Execution Time. The default is one minute but you can select seconds. For example, if you have the max execution time defined as 5 minutes in the Configuration you can set a lower max execution time of 2 minutes because it's less than 5.
-
Order - Defines the order that this automation runs if it is triggered at the same time as other automations. For example if you have Sensor 1 set to trigger Automation A and B. Setting Automation A as 0 and Automation B as 1 will run A followed by B.
-
-
Click Save Automation.
On This Page