New versions of the SysTrack Agent are deployed to systems in the tree, either in stages or all at once, using the Deployment tab. A pause/play button allows you to pause deployment and start it again. If used, deployment stages are listed, and additional stages can be added. Overall deployment progress, threshold, and stage timeout are charted. Details of the current stage are shown on the right, including threshold percentage, success timeout, start criteria, and start time.
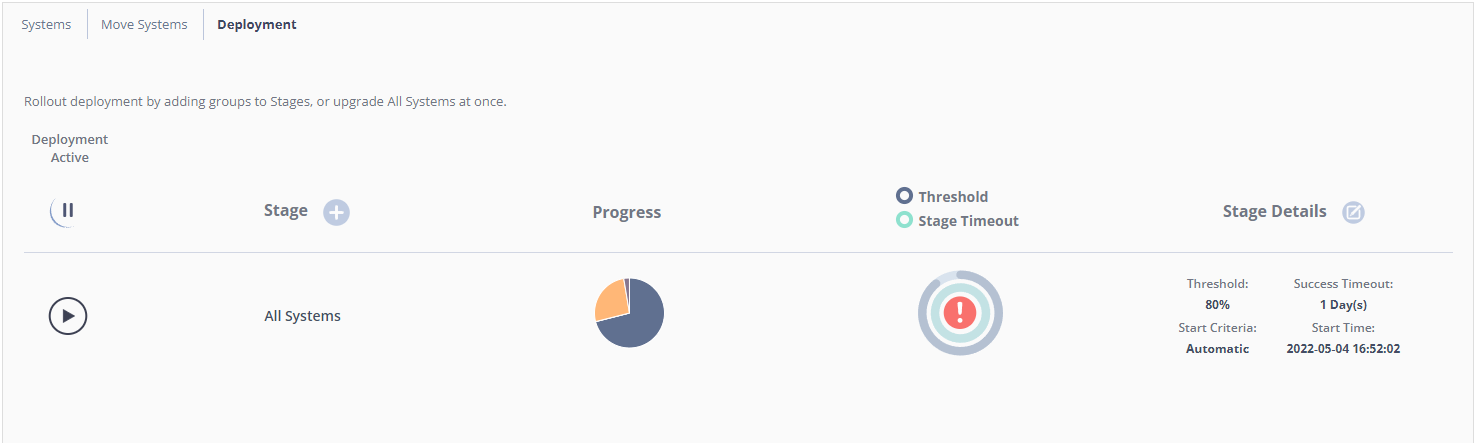
The Deployment tab is on the Assignments page (Configure > System Configuration > Assignments).
Prerequisites for Agent Deployment
The Systems Management Supervisor service must be running on each endpoint. This service downloads and installs the agent updates.
Add, Edit, or Remove Deployment Stages
Click the lock icon on the top right of the page to unlock SysTrack Configure for editing.
If Deployment Active shows, click the pause icon to pause the deployment.
Click the add icon next to Stage to add a stage, or click the edit icon next to Stage Details to change stages. The Stage Manager dialog opens.
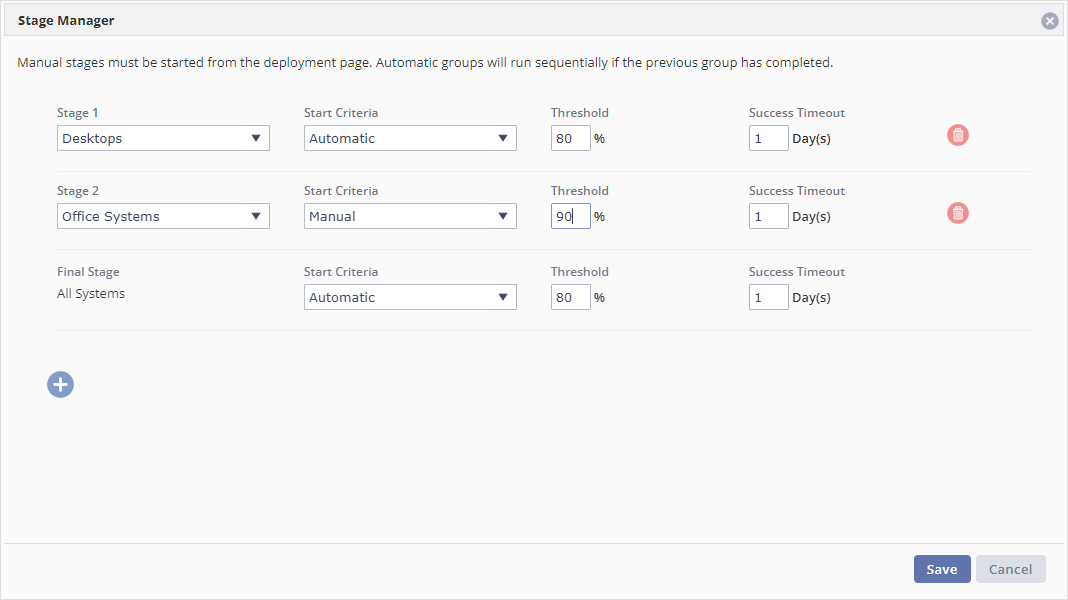
To add a new stage, click the + button in the lower left. A new stage is added prior to the Final Stage.
Choose a group from the Select Group drop-down on the left. Groups might include office systems, laptops, remote systems, virtual systems, and physical systems.
Choose Automatic or Manual from the Start Criteria drop-down. Each group with automatic start will run in the sequence shown after completion of the previously staged group. Stages set to manual start must be started from the Deployment tab. The default is Automatic.
In the Threshold field, enter the percentage of systems in the selected group that must complete deployment for the stage to be considered complete. The deployment will continue to all of the systems in that group, but the threshold is considered the minimum completed to allow the next deployment group to start. The default is 80 percent.
In the Success Timeout field, enter the maximum number of days allowed to reach the specified threshold for that stage. If the threshold is not reached within the success timeout period, the deployment process does not continue to the next stage. The default is 1 day.
To remove one of the stages from the scheduled deployments, click the trash can icon on the right.
IMPORTANT: The Stage Manager dialog does not ask you to confirm when you remove a stage. The stage is deleted when you click Save.
When the desired stages have been established, click the Save button. The stages are displayed with the progress, threshold, and timeout for each.
If you paused the deployment, click the play icon to run it again.
Click the lock icon on the top right of the page to end your editing session and lock SysTrack Configure.
Troubleshooting
A Deployment Stage Does Not Complete
A deployment stage counts a system as upgraded only when both the agent and the Systems Management Supervisor service on that system are current. Until the Supervisor service checks in, the stage shows the system as waiting. Make sure that the Systems Management Supervisor service is running on the systems that wait.